SSO Setup
Last updated: July 24, 2026
Configure Single Sign-On (SSO) and Just-In-Time (JIT) user provisioning for your organization. For automated provisioning via your IdP, see SCIM Provisioning Setup.
New! Iris now supports SCIM provisioning
Supported Identity Providers:
Google Workspace (SAML or OIDC)
Okta
Microsoft Entra ID (Azure AD)
OneLogin
Jumpcloud
Any SAML 2.0-compliant Identity Provider
SSO vs. SCIM: This article covers authentication (signing in) and JIT provisioning. Iris also supports SCIM 2.0 automated provisioning — creating, updating, and deactivating users directly from your IdP, with entitlement sync and access-review audit trails. If your IT team wants your IdP to be the source of truth for user lifecycle and access, see SCIM Provisioning Setup after completing SSO. SSO and SCIM are separate channels: your login app points at Auth0, while your SCIM provisioning app points directly at Iris.
Prerequisites
Before setting up SSO, ensure you have:
Admin access to your Iris organization settings
Admin access to your Identity Provider
Your Identity Provider's SAML metadata URL or XML
Your organization's email domain (e.g., acmecorp.com)
Setting Up SSO
Go to Settings > Security

Click the "+ Setup SAML SSO" button to begin. Iris will provide you with three values to enter into your Identity Provider:
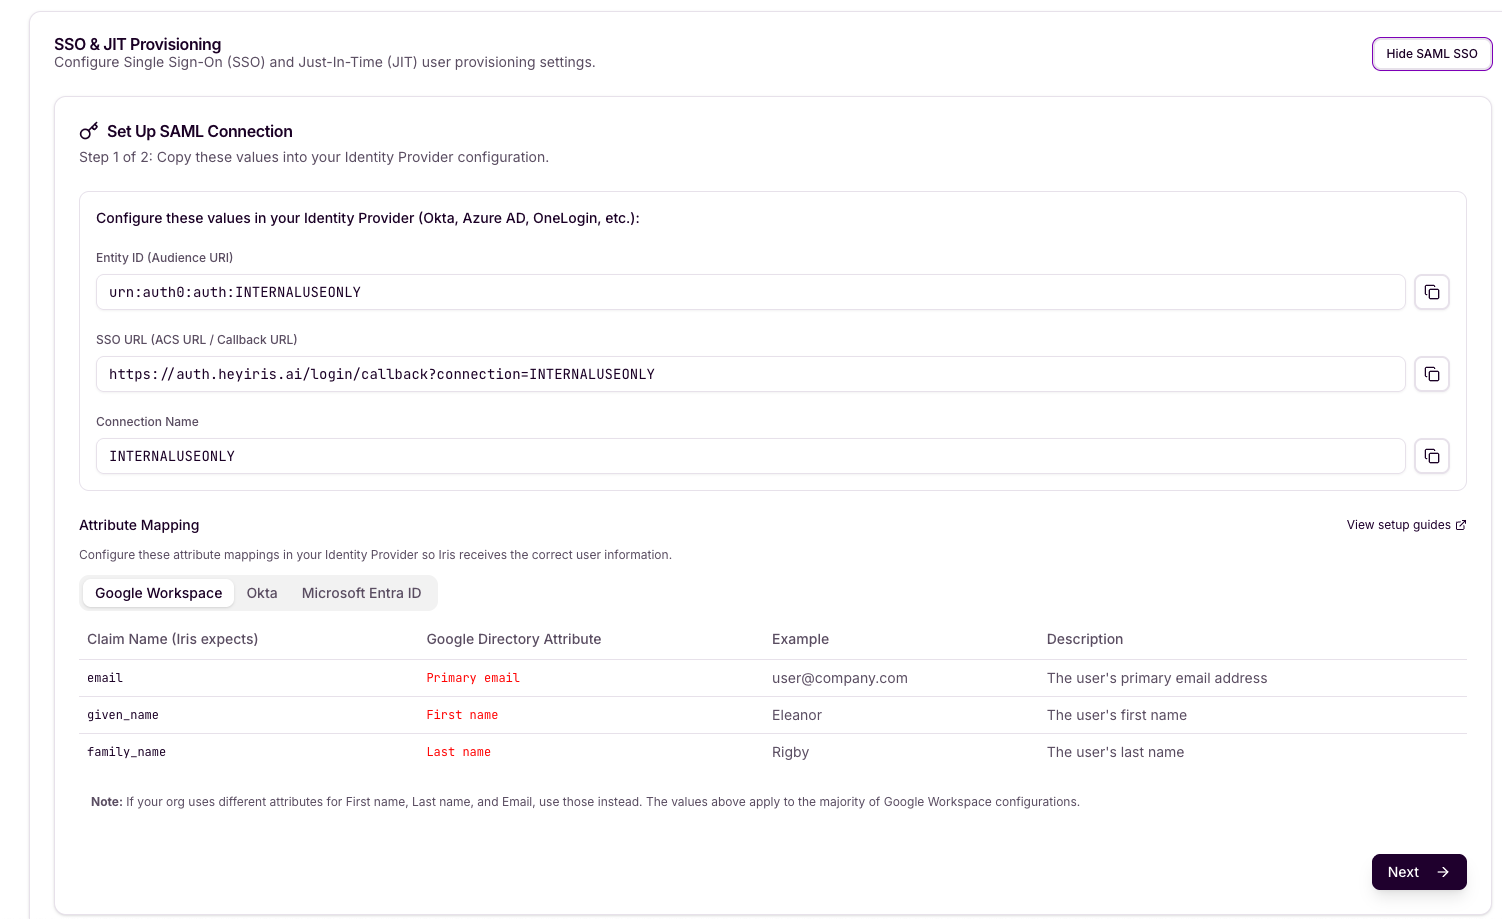
Copy each value using the copy button next to the field and paste them into the corresponding fields in your Identity Provider's application settings.
Field | Description |
Entity ID (Audience URI) | Uniquely identifies Iris as the Service Provider to your IdP. |
SSO URL (ACS / Callback URL) | The URL where your IdP sends SAML responses after authentication. Follows the format: https://auth.heyiris.ai/login/callback?connection=<CONNECTION> |
Connection Name | A unique identifier for this SAML connection. Use this value when configuring your IdP. |
Add second org-specific identifier urn:auth0:heyiris-prod:<CONNECTION> as an Identifier in your Enterprise Application alongside the existing one:
Azure Entra → Enterprise App → Single sign-on → Identifier (Entity ID)
Okta → SAML app → Audience URI (SP Entity ID)
Google Workspace → SAML app → (Entity ID)
OneLogin → SAML app → Audience (EntityID)
Attribute Mapping
Configure the following attribute mappings in your Identity Provider so Iris receives the correct user information. Select your IdP below for the relevant attribute names:
Google Workspace
Claim Name (Iris expects) | Attribute | Example | Description |
Primary email | The user's primary email address | ||
given_name | First name | Eleanor | The user's first name |
family_name | Last name | Rigby | The user's last name |
Okta
Claim Name (Iris expects) | Attribute | Example | Description |
The user's primary email address | |||
given_name | user.firstName | Eleanor | The user's first name |
family_name | user.lastName | Rigby | The user's last name |
Microsoft Entra ID
Claim Name (Iris expects) | Attribute | Example | Description |
user.mail | The user's email address | ||
given_name | user.givenname | Eleanor | The user's first name |
family_name | user.surname | Rigby | The user's last name |
Note: If your org uses different attributes for First name, Last name, and Email, use those instead. The values above apply to the majority of configurations.
Provide XML Metadata
In this step, you will supply Iris with your Identity Provider's metadata. This tells Iris how to communicate with your IdP for authentication.
Choose one of the two methods to provide your IdP metadata:
Recommended: Metadata URL
Metadata XML: Paste your IdP's SAML metadata XML directly if a URL is not available.
Using Metadata URL (Recommended)
Enter your Identity Provider's SAML metadata URL in the IDP Metadata URL field. This is the URL where your IdP publishes its SAML metadata. Common examples:
Google Workspace example:
https://accounts.google.com/o/saml2/idp?idpid=<YOUR_IDP_ID>
Okta example:
https://<YOUR_DOMAIN>.okta.com/app/<APP_ID>/sso/saml/metadata
Entra ID example:
https://login.microsoftonline.com/<TENANT_ID>/federationmetadata/2007-06/federationmetadata.xml
Company Email Domain
Enter your organization's email domain (e.g., acmecorp.com). Users with this email domain will be automatically routed to this SAML connection when they log in to Iris.
Note: Do not include the @ symbol — enter the domain only (e.g., acmecorp.com, not @acmecorp.com).
Enable IDP-Initiated SSO (Optional)
Toggle this setting on if you want users to be able to start the login flow directly from your Identity Provider's application portal (e.g., an Okta dashboard or Google app launcher), rather than always starting from the Iris login page.
Completing Setup
Once all fields are filled in, click "+ Create Connection" to finalize the SAML connection. Iris will verify the metadata and activate SSO for your organization.
After setup is complete:
Users with your configured email domain will be automatically routed to your SSO login when they click Sign in with SSO from the Iris Login page (https://studio.heyiris.ai/login)
New users who authenticate via SSO will be provisioned automatically (JIT provisioning). If you've enabled SCIM provisioning, your IdP manages user creation, updates, and deactivation instead — including deprovisioning, which JIT does not handle.
You can view or hide the SAML SSO configuration at any time from the SSO & JIT Provisioning section in your org settings.
You can choose what role to give JIT-provisioned users within Settings > Security as well
To automate the full user lifecycle (deprovisioning, role sync, group-based content access, audit logs), set up SCIM Provisioning.
Need Help?
If you encounter issues setting up SSO that are not covered in this guide, please reach out to your Iris CSM or contact Iris support at support@heyiris.ai