SCIM
Last updated: July 24, 2026
SCIM Provisioning Setup
Connect your identity provider to Iris for automated user provisioning, deprovisioning, entitlement sync, and access-review audit trails.
Overview
SCIM 2.0 provisioning lets your identity provider (IdP) automatically create, update, and deactivate Iris users — no manual steps — with every change recorded for access reviews.
Supported Identity Providers include:
Okta
Microsoft Entra ID (Azure AD)
Google Workspace (Cloud Identity)
Any SCIM 2.0-compliant Identity Provider
How this relates to SSO: SSO and SCIM are two separate channels from the same identity provider, and they do different jobs:
Channel | Purpose | Where it points |
|---|---|---|
Authentication (SAML / OIDC) | Signing in — proving who you are | IdP → Auth0 → Iris login |
Provisioning (SCIM 2.0) | Creating / updating / deactivating users & access | IdP → |
Point your IdP's login app at Auth0 (see our SSO Setup guide) and its SCIM provisioning app directly at Iris. Both come from the same IdP — they just use different protocols.
Note for Google Workspace customers: Auto-provisioning in Google Admin Console requires Google Workspace Business Plus, Enterprise Standard, Enterprise Plus, or Cloud Identity Premium. Business Starter and Standard support SSO but not SCIM push provisioning.
Prerequisites
Before setting up SCIM, ensure you have:
Admin access to your Iris organization settings
Admin access to your Identity Provider (Google Workspace requires Super Admin or App Admin)
SSO already configured (recommended — see SSO Setup)
What SCIM Manages in Iris
Iris has two independent access dimensions. Understanding the split is the key to mapping your IdP correctly.
Content access — Groups. Your IdP's groups map to Iris groups, which control which tagged knowledge/content a user can see. These are many-to-many — a user can be in Engineering and Legal at once.
Permission tier — Role. A user's single role (e.g. Admin, Editor, Collaborator) controls what they can do in the product. Each user has exactly one role. It is set with a dedicated user attribute (systemRole), not via group membership.
In SCIM terms | Maps to in Iris | Cardinality |
|---|---|---|
Group ( | Iris group → content access | many per user |
User attribute | Role → feature permissions | one per user |
Setup in Iris
Do these once, as an organization admin, before configuring your IdP.
Step 1 — Define your roles
Go to Settings > Users > Roles and make sure the roles you want to grant exist (Admins, Standard, Collaborators, or custom). Roles carry permissions and are owned by Iris — your IdP grants them, it doesn't create them.
Step 2 — Generate the SCIM token
Go to Settings > Security > Authentication. In the SCIM provisioning token row:
Click Generate (or Rotate to replace an existing token).
Copy the token immediately — it is shown once and never displayed again.
Use Revoke to disable provisioning at any time.
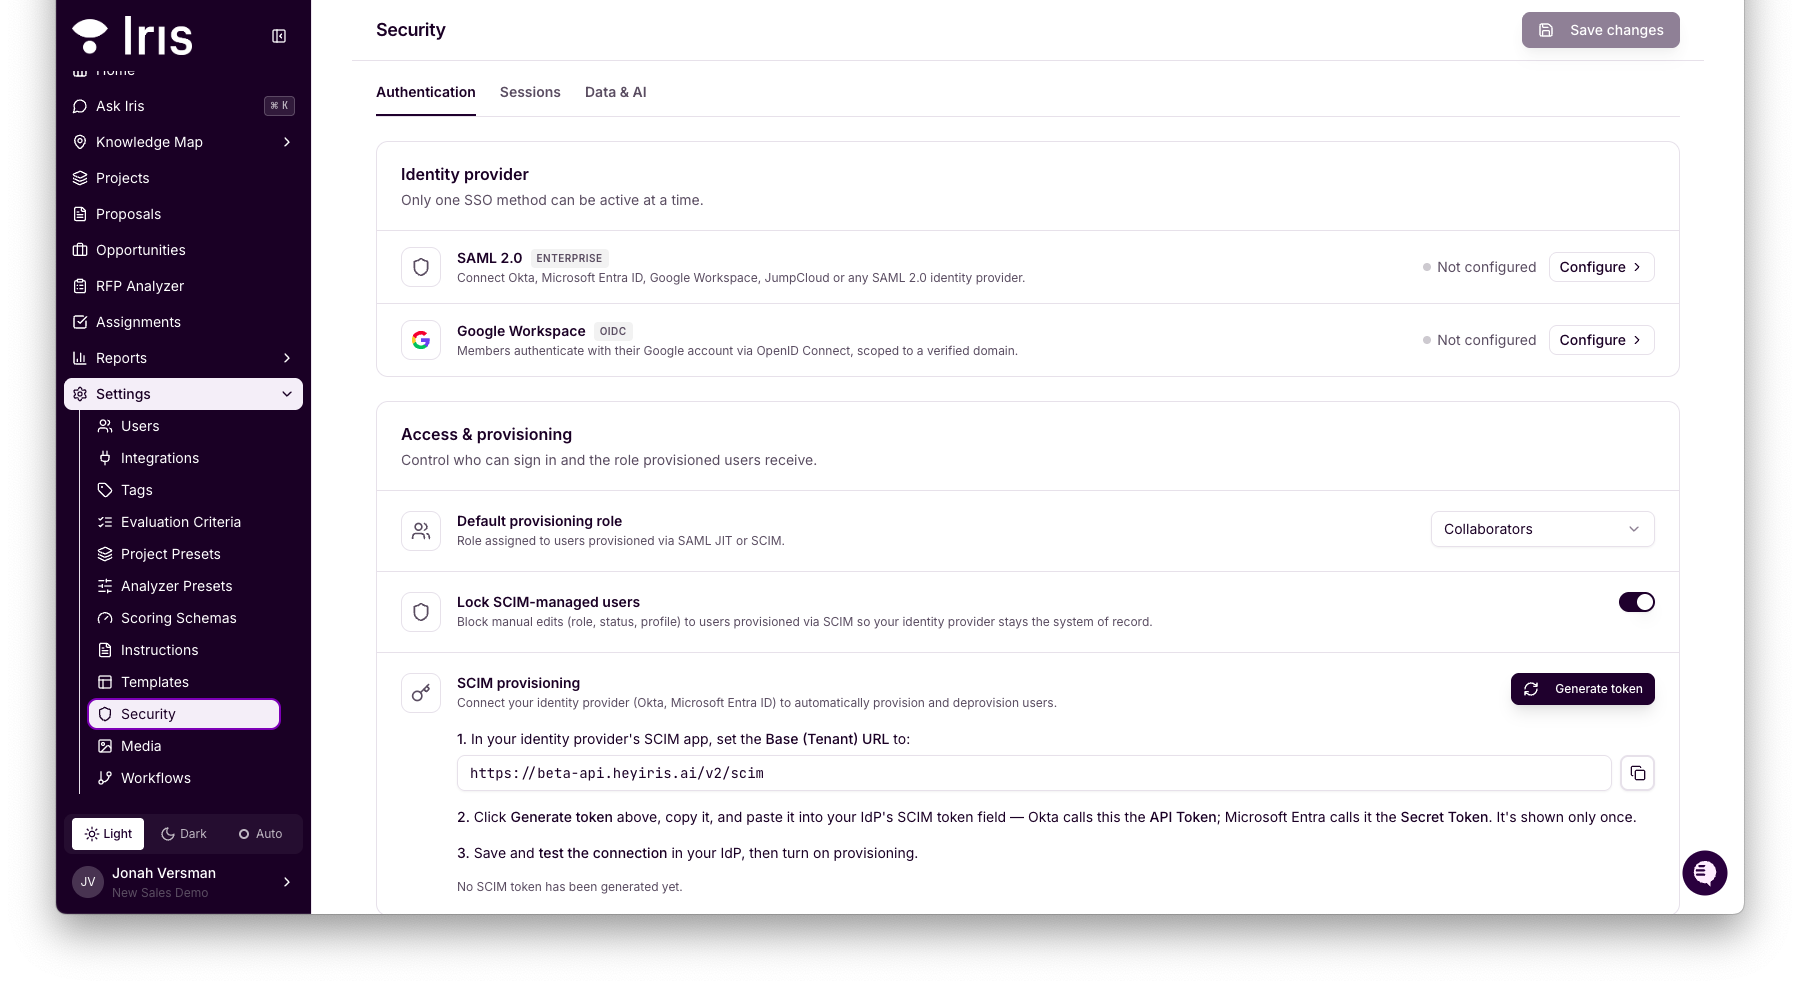
The token is the bearer credential your IdP will use. Your SCIM base URL is shown next to it:
https://beta-api.heyiris.ai/v2/scimSecurity note: The SCIM bearer token grants full provisioning access to your Iris organization. Store it in your secrets manager and never log or expose it. Rotating the token revokes the old one immediately — provisioning pauses until your IdP is updated with the new value.
Step 3 — Set the drift policy
In the same panel, Lock SCIM-managed users (recommended: on) blocks manual edits to role/status/profile for users provisioned by SCIM, so your IdP stays the single source of truth. SCIM-managed users show a "Managed by SCIM" badge in Settings > Users.
Setup in Your Identity Provider
Steps below cover Okta, Microsoft Entra ID, and Google Workspace; any SCIM 2.0 IdP follows the same pattern.
Step 1 — Create the SCIM connection
Okta / Entra ID / other SCIM 2.0 IdPs: create (or open) the Iris provisioning app and enter:
Setting | Value |
|---|---|
SCIM base / connector URL |
|
Authentication | HTTP Header / OAuth Bearer Token |
Bearer token | the token generated in Iris (Step 2 above) |
Unique identifier for users |
|
Provisioning actions | Push new users, push profile updates, push groups, deactivate users |
Google Workspace: at admin.google.com, navigate to Apps > Web and mobile apps and open your Iris SAML app (see SSO Setup if you haven't added it yet). On the Provisioning tab, toggle Enable auto-provisioning on and enter the same values as above. Then, under Provisioning scope, choose All users in the organization or select specific Organizational Units (OUs) — only users in scope are provisioned into Iris.
Use Test Connection — the IdP calls /ServiceProviderConfig and should confirm support for filtering and PATCH.
Step 2 — Map user attributes
Map the IdP's primary email to userName. Keep the mapping to what Iris uses:
IdP attribute | SCIM attribute | Notes |
|---|---|---|
Email (primary) |
| the identity; matching key |
First name |
| |
Last name |
| |
Work / primary email |
| |
Account status |
| false (or Suspended in Google) = deprovision |
IdP object ID / Google unique ID |
| recommended — stable reconciliation key |
Setting the Iris role from the IdP (optional): To drive a user's permission role from the IdP, add a custom attribute systemRole under the extension urn:ietf:params:scim:schemas:extension:iris:2.0:User, restricted to an enum of your actual Iris role names (e.g. Admins, Standard, Collaborators). In Google Workspace, create the custom attribute under Directory > Custom attributes > Add custom attribute, then map it to the extension field. If omitted, users get the org's default role. An unrecognized value is safely ignored (the user keeps their current role) — it never blocks provisioning.
Step 3 — Push groups (content access)
Use the IdP's native Group Push to sync the groups that should grant content access (in Google Admin, this is the Groups sub-tab within Provisioning). Each pushed group becomes an Iris user group; membership changes add/remove content access. Iris will create a pushed group if it doesn't exist — it grants nothing until an admin attaches content tags — so both "create" and "link to existing" work.
What Happens During the Lifecycle
Event in the IdP | Result in Iris |
|---|---|
New user assigned to the app (or added to provisioned OU) | User created & active, given the default (or mapped) role; a license seat is consumed |
Profile / name / email change | User record updated |
Added/removed from a pushed group | Content-access group membership updated |
| User's single permission role updated |
User deactivated / suspended / unassigned | User deactivated immediately, tokens revoked, license seat freed |
User re-activated | Access and prior role restored |
Access Reviews & Audit Trail
Every identity and entitlement change is recorded in an append-only audit log — provisioning, attribute changes, (de)activation, and role/group grant/revoke — with actor, timestamp, and old/new values.
To view it in Iris:
Go to Settings > Security > SCIM Audit logs (org admins; the tab appears once SCIM is set up).
Review the table — time, event, source, target user, and the exact change — and filter by event type and date range.
Click Export CSV to download the filtered trail for an access review.
For full access certifications and just-in-time elevation, run those in your IdP's governance product (e.g. Okta Identity Governance) with Iris as the SCIM target — Iris exposes the entitlements; the IdP runs the reviews.
Endpoint Reference
Base: https://beta-api.heyiris.ai/v2/scim
Method & path | Purpose | Auth |
|---|---|---|
GET | Discovery | public |
GET / POST | List / create users | SCIM token |
GET / PUT / PATCH / DELETE | Read / replace / update / deactivate | SCIM token |
GET / POST | Content-access groups & membership | SCIM token |
GET / POST / DELETE | Manage the SCIM token | Org admin |
GET | Export the audit trail | Org admin |
Troubleshooting
Symptom | Likely cause & fix |
|---|---|
401 on SCIM calls | Missing/invalid/revoked token — regenerate in Iris and update the IdP |
409 uniqueness / Conflict | A user/group with that |
409 SCIM_MANAGED_USER | Drift lock is on and someone tried to edit a SCIM-managed user in Iris — make the change in the IdP |
Permission role didn't change | Roles are set via the |
400 invalidFilter | Only simple equality filters are supported, e.g. |
Test Connection fails | Verify the SCIM base URL ends with |
Need Help? Iris can set up a short IT-to-IT call to confirm group-to-role mapping, deprovisioning rules, and audit/logging requirements during onboarding. Reach out to your Iris CSM or contact Iris support at support@heyiris.ai