Answering Word (.docx) Questionnaires in Iris
Last updated: September 29, 2026
Iris can answer a Word (.docx) questionnaire, RFP or security assessment directly in your customer's own file, with the right boxes ticked and the right drop-down values selected. This article walks you through the full flow: staging, correcting marks, reviewing answers, exporting and adding questions later.
How it works
When you create a project from a Word file, Iris opens it in the staging area before writing any answers. Staging shows you, on top of your original document, what Iris thinks each paragraph and table cell is: a question, an answer slot, a checkbox or drop-down, a heading, or text to leave alone.
Your document does not change during staging. The colored marks are an overlay. They tell Iris exactly where each answer goes and in what format, so the final export lands every answer in the right spot.
Supported document layouts
Iris recognizes the most common Word questionnaire formats and handles each one differently.
Document layout | What Iris does |
|---|---|
Table with a Question column and a Response or Answer column | Marks each question cell and the answer cell in the same row. Header rows are skipped. |
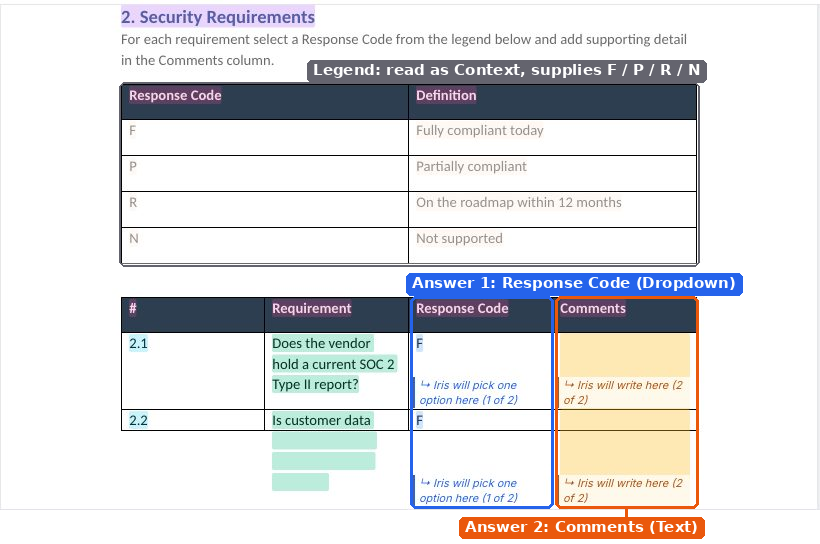
Response Code column with a legend (for example, F = Fully compliant) | Turns the column into a drop-down. Iris only ever picks one of the values in the legend. |
Cells with checkbox glyphs (for example, ☐ United States ☐ European Union) | Reads each box as an option. Two or three boxes are treated as single select. If the wording says "select all that apply", Iris may tick more than one. |
Numbered questions followed by ☐ Yes ☐ No, Comment: and Evidence: lines | The numbered question owns the lines beneath it. Iris ticks Yes or No and fills in the Comment and Evidence slots. |
Fill-in blanks, such as "______ hours" | Writes the answer into the blank and keeps the surrounding wording. |
Table of contents, instructions and lead-in sentences | Never treated as questions. |
Step 1: Create a project from your Word file
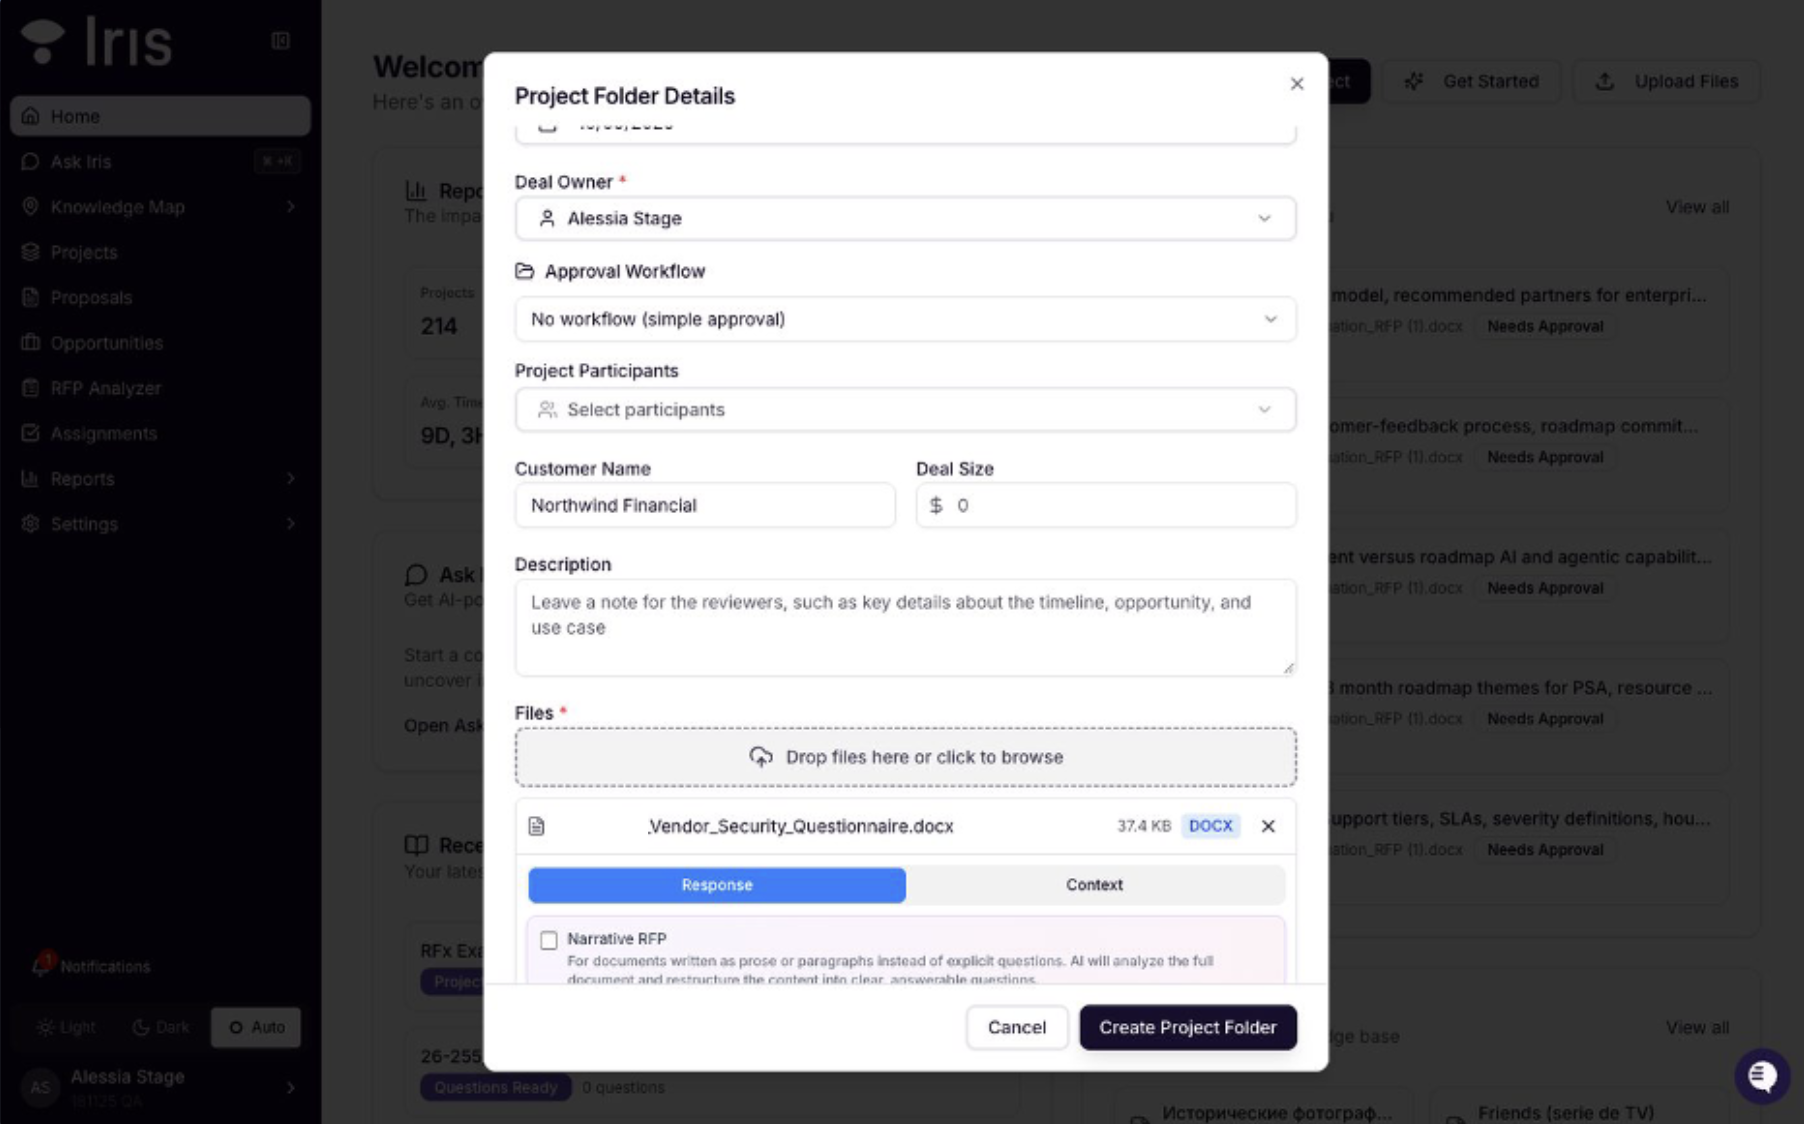
From Home or Projects, click Start a Project.
Enter a project folder name and due date. You can also add the customer name and deal size.
Drop your .docx file into Files and leave it set to Response so Iris answers it.
Click Create Project Folder. Iris extracts the questions and opens the staging area, which usually takes 30 to 60 seconds.
Important: Do not tick Narrative RFP for a questionnaire that has explicit questions. Narrative RFP is meant for a different kind of document.
Before staging opens, Iris asks for your project context: the reviewer, an approval workflow, the Knowledge Map tags to draw answers from, and any style instructions. These are the same settings as any other project, and you can change them later from Edit Context.
Step 2: Get to know the staging screen
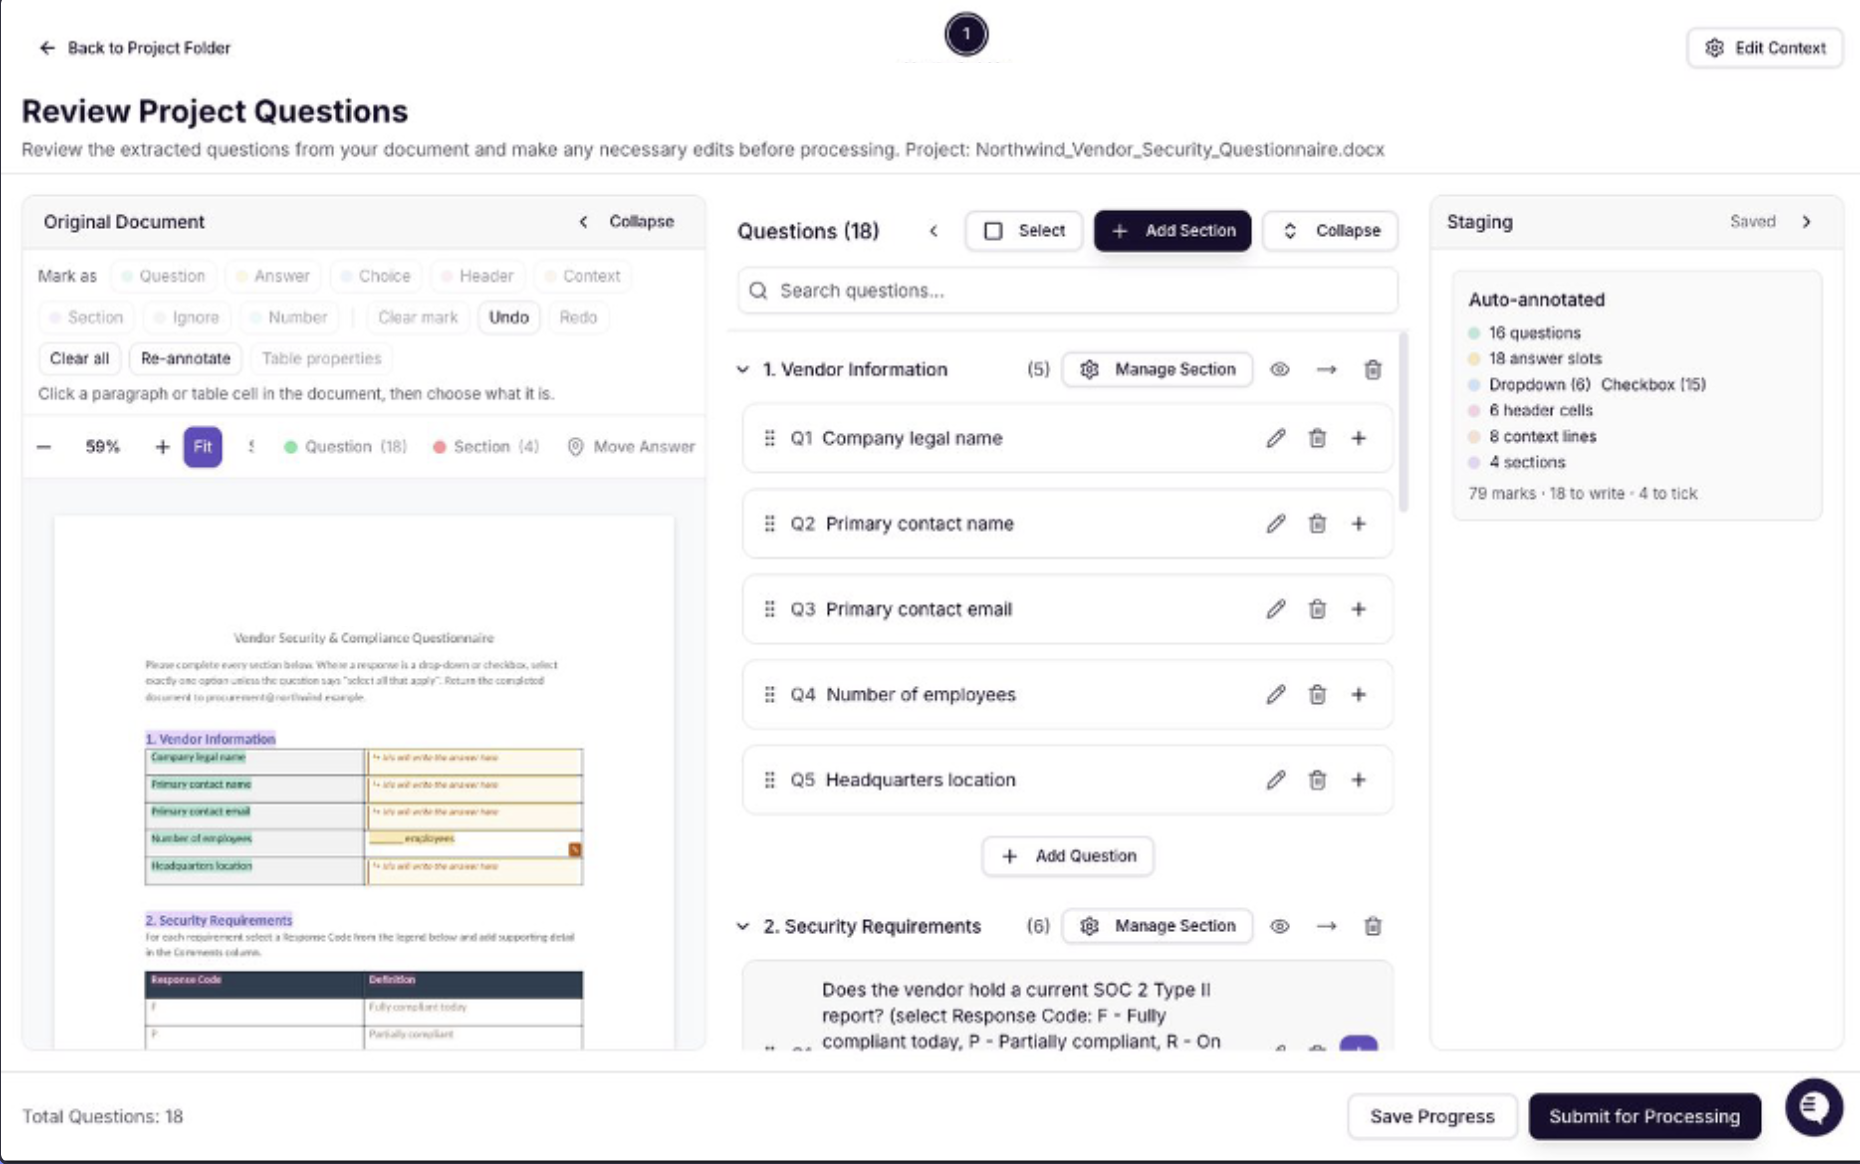
The staging screen has three panes. Each can be collapsed with the arrow in its header, which is handy when you want to view the document at full width.
Pane | What it shows |
|---|---|
Original Document | Your Word file, page by page, with colored marks on top. The toolbar holds the Mark as buttons, Undo, Redo, Clear all, Re-annotate and Table properties. Use the zoom controls or Fit to size the page. |
Questions | The questions Iris will answer, grouped by section in document order. Edit, delete, add, search, reorder and manage sections here. |
Staging | A running summary of what Iris found: questions, answer slots, drop-downs, checkboxes, headers, context lines and sections, plus autosave status. |
Autosave: Every mark you make is saved as you go. When the Staging pane shows Saved, it is safe to leave the page. Save Progress at the bottom also keeps your question edits without submitting.
What the colors mean
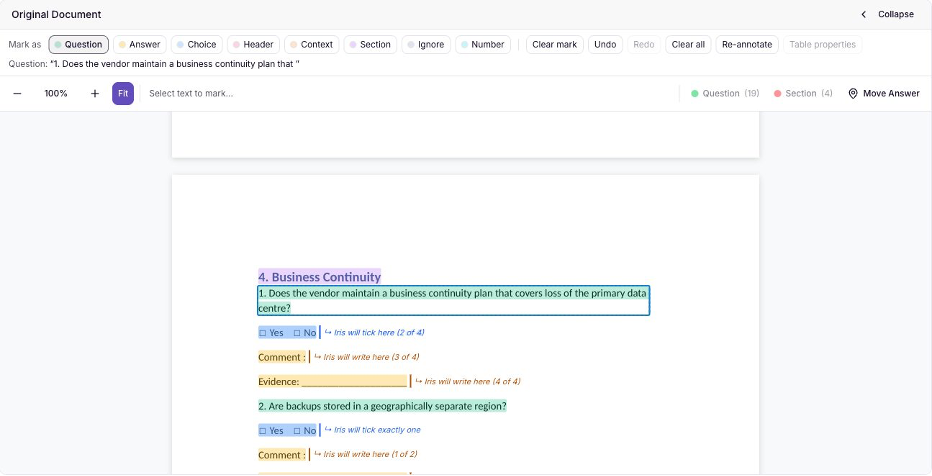
Each color is a role. These match the Mark as buttons in the toolbar.
Mark | Colour | Meaning |
|---|---|---|
Question | Green | Text Iris will answer. Hover to see which question it is. |
Answer | Yellow | A slot where Iris writes free text. Labelled "Iris will write the answer here", or "Iris will write here (2 of 2)" when a question has several slots. |
Choice | Blue | A drop-down or a set of checkboxes. Labelled Dropdown or Checkbox, with a note such as "Iris will pick one option here" or "Iris will tick exactly one: Yes · No". |
Header | Pink | A table header cell. Headers are never answered. |
Context | Orange | Text Iris should read but not answer, such as legend rows or instructions. |
Section | Purple | A heading that groups the questions below it. Sections become groups in the question list. |
Ignore | Grey veil | Text Iris skips entirely. |
Number | Light blue | The printed question number in a table. Kept as the number, never answered. |
Tip: Hover over any mark or its label to see exactly what Iris plans to do there: which question it belongs to, whether it will write or tick, and which options it can choose from.
A few examples of how common layouts look once marked:
Simple two-column table: question cells are green and answer cells are yellow. A blank such as "______ employees" is filled in place.
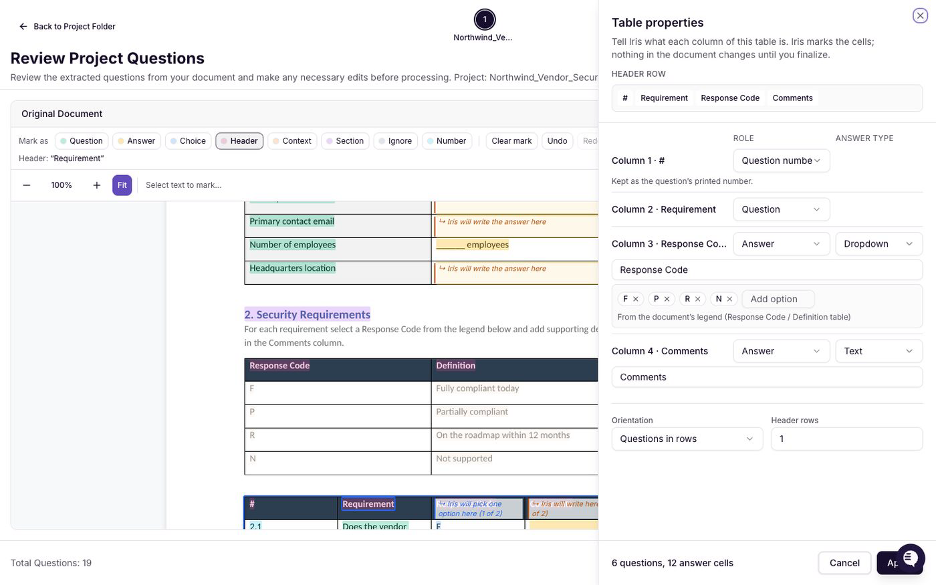
Requirements table with a Response Code legend: the legend is Context, the Response Code column is a drop-down (one of F, P, R, N) and Comments is a free-text slot, so each row gets two answers.
Checkbox cells: each ☐ is read as an option, and the label shows whether Iris will tick exactly one or one or more.
List-style section: the numbered question owns the ☐ Yes ☐ No line and the Comment and Evidence slots beneath it.
Step 3: Correct anything Iris got wrong
Auto-annotation is a starting point. Most documents need no changes, but if Iris misses a question, marks the wrong cell or reads a heading as a question, you can fix it directly in the document.
Mark a paragraph or cell
Click the paragraph or table cell in the Original Document pane. The toolbar shows its current role, for example "Unmarked" or "Header".
Choose a role from Mark as: Question, Answer, Choice, Header, Context, Section, Ignore or Number.
The mark appears right away. The Staging pane counts update, and the question list adds or removes the item.
When you mark a numbered question as a Question, it automatically owns the Yes / No, Comment and Evidence lines beneath it.
Undo, clear and start over
Clear mark removes the mark from the selected item only.
Undo and Redo step through your changes.
Clear all removes every mark so you can annotate the document by hand.
Re-annotate runs automatic detection again and replaces all marks, including your manual ones. Iris asks you to confirm first, and Undo restores the previous marks if you change your mind.
Tip: If the question list shows a question with no green mark in the document, Iris has nowhere to place its answer. Mark the paragraph in the document, then delete the unanchored duplicate from the list so the question is not answered twice.
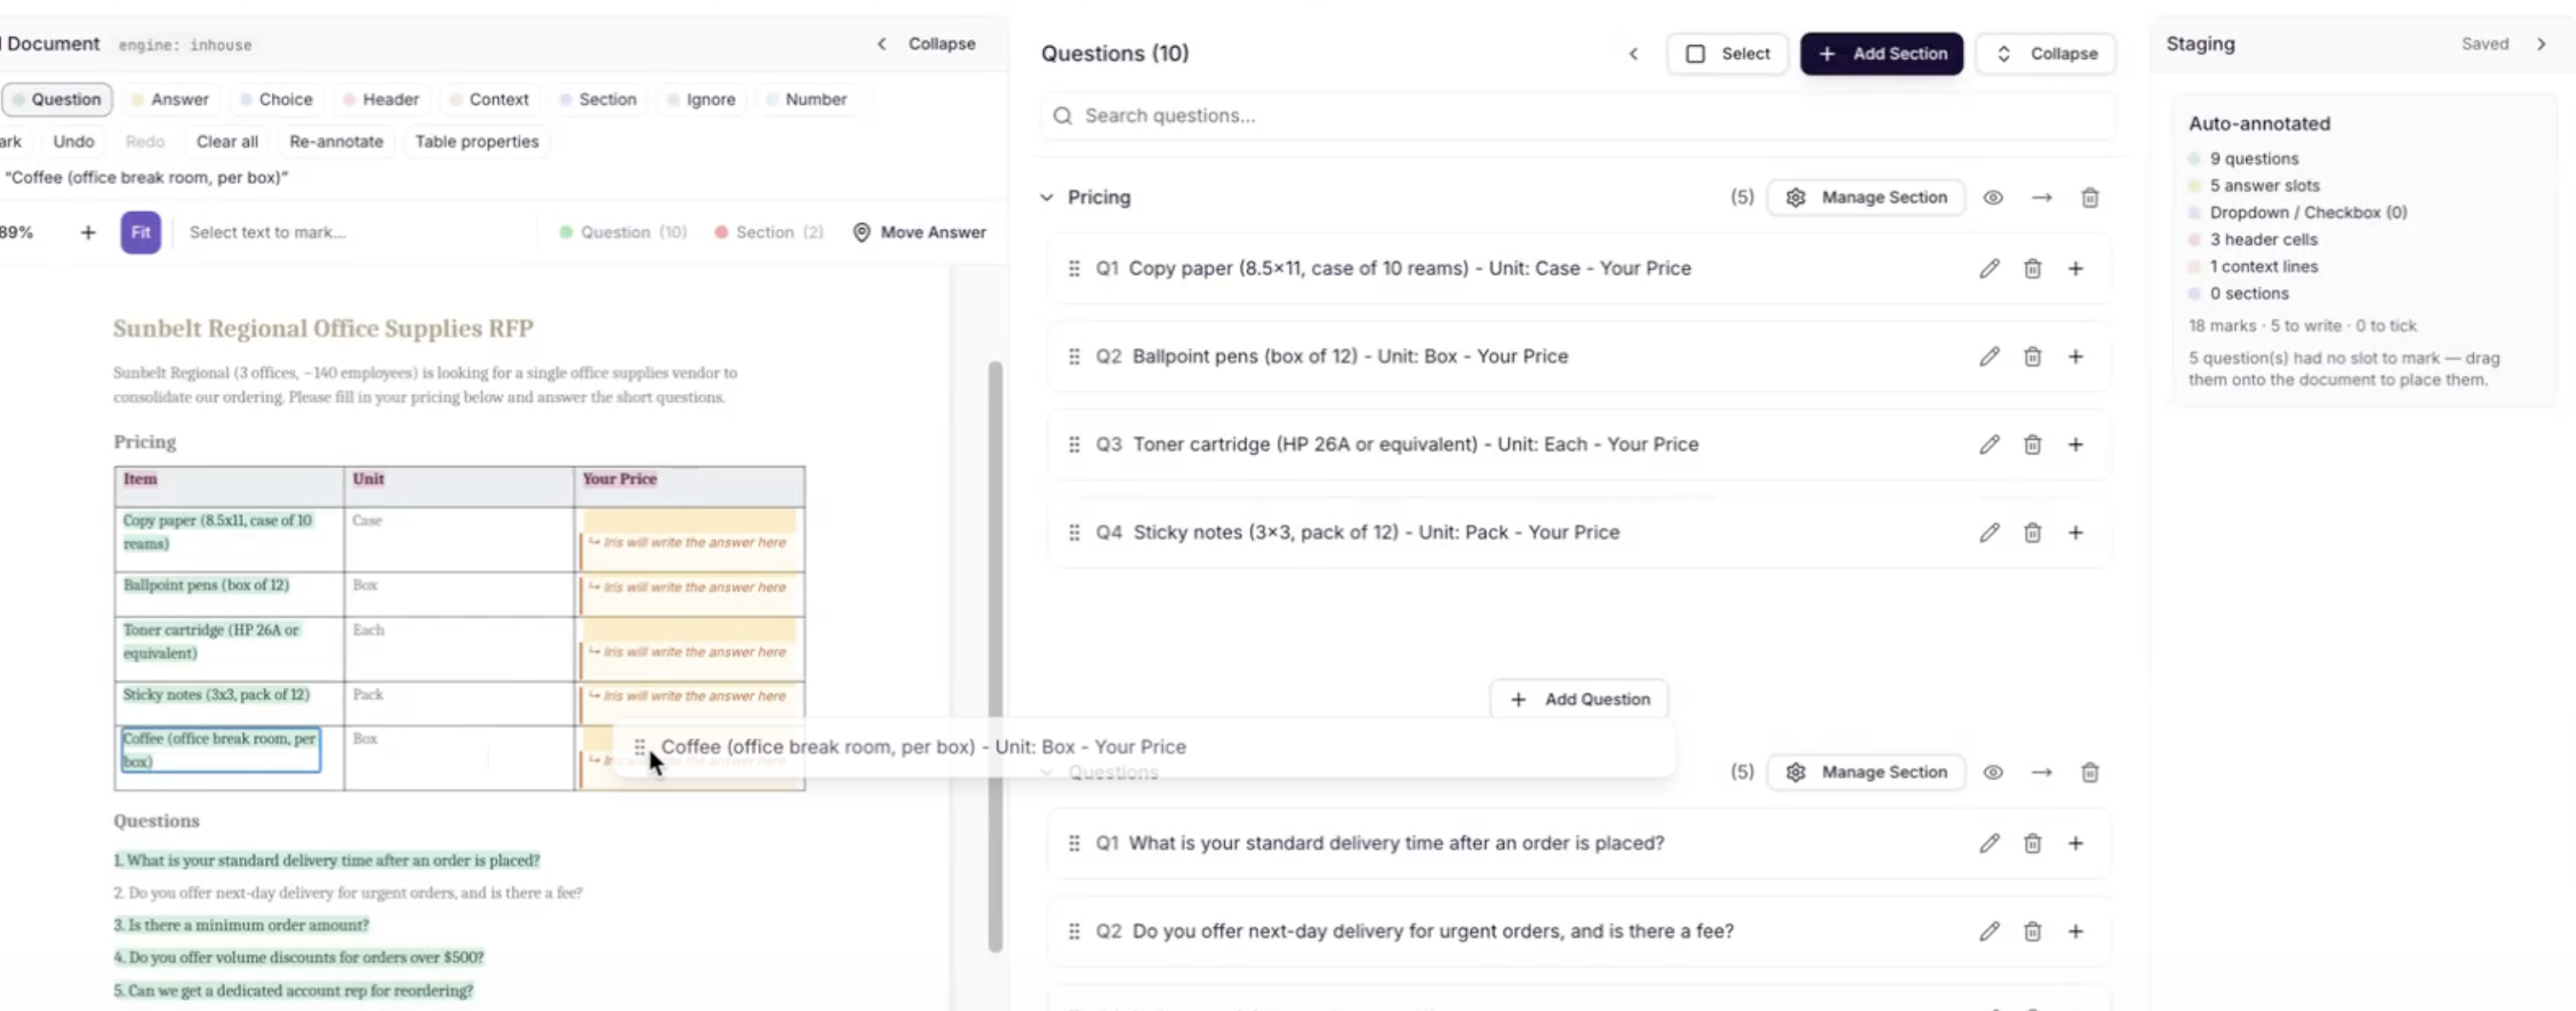
New: Drag and drop answer placement (MVP)
You can now drag an answer and drop it where it belongs in the document, instead of re-marking cells by hand. This is an early (MVP) release, so a few limits apply.
Supported: questions with a single answer slot.
Not supported yet: questions with more than one answer, such as a row with both a Response Code and a Comments column. For these, set the answer locations with Mark as or Table properties instead.
Step 4: Set roles for a whole table with Table properties
For tables, it is faster to describe the columns once than to mark cells one by one. Click any cell in the table, then click Table properties. A side panel opens next to the document so the table stays in view.
Setting | What it does |
|---|---|
Header row | The cells Iris treats as headers. Click a header to highlight that column in the document. |
Role | Set per column: Question, Answer, Question number, Context, Section or Ignore. |
Answer type | For Answer columns: Text, Dropdown or Checkbox. Iris writes text, sets a native Word drop-down, or ticks boxes. |
Answer label | The answer's name in the review screens, for example "Response Code" or "Comments". |
Options | For Dropdown and Checkbox answers: the allowed values, shown as chips. They are read from the document's own control or legend, and you can rename, remove or add options. If a column is set to Dropdown but the cell has no control, Iris inserts a native Word drop-down on export. |
Orientation | Questions in rows (the default), or questions in columns for transposed tables. |
Header rows | How many rows at the top are headers. |
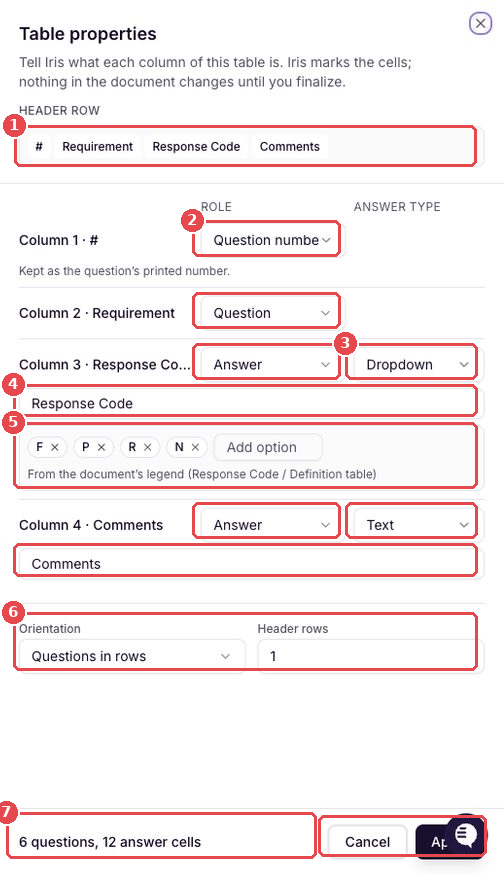
The panel footer previews what your settings will produce, for example "6 questions, 12 answer cells". Nothing changes until you click Apply. Cancel leaves the marks as they were.
Apply to similar tables: Many questionnaires repeat the same table on every page. When Iris detects a matching layout, it can offer to apply the same roles to those tables. This option is off by default so you stay in control.
Step 5: Review the question list
The Questions pane works the same way as in Excel and PDF staging. Every change stays in sync with the marks in the document, and the question count at the bottom of the screen is exactly what Iris will answer.
Edit wording: click the pencil, change the text and confirm with the tick. The matching mark is highlighted in the document while you edit.
Delete: click the bin icon to remove a question. Its answer slots are released.
Add Question and Add Section: add items that are not in the document, such as a question your customer sent by email.
Manage Section: set tags, custom instructions, a workflow and assignees for every question in a section at once.
Search, drag to reorder and Select for bulk actions work as they do elsewhere in Iris.
Step 6: Save or submit
Save Progress stores your marks and question edits without generating answers. You can come back any time from the project folder.
Submit for Processing sends each question along with its exact location in the document. Iris returns you to the project folder, which shows Generating Answers while it works.
Step 7: Review answers on the project page
The project page works like it does for any other file, with two differences for Word questionnaires:
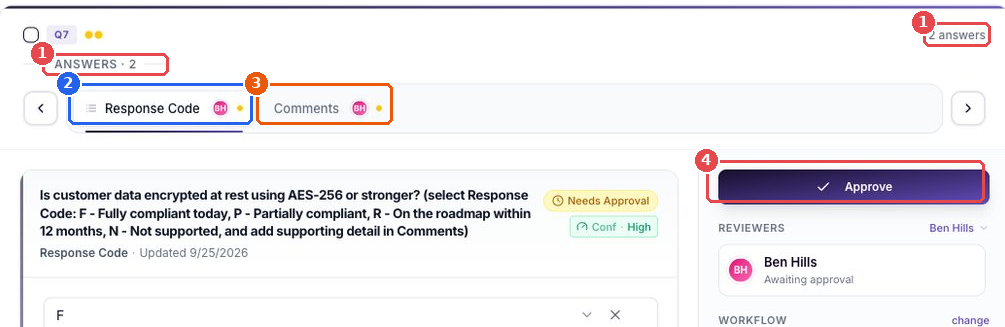
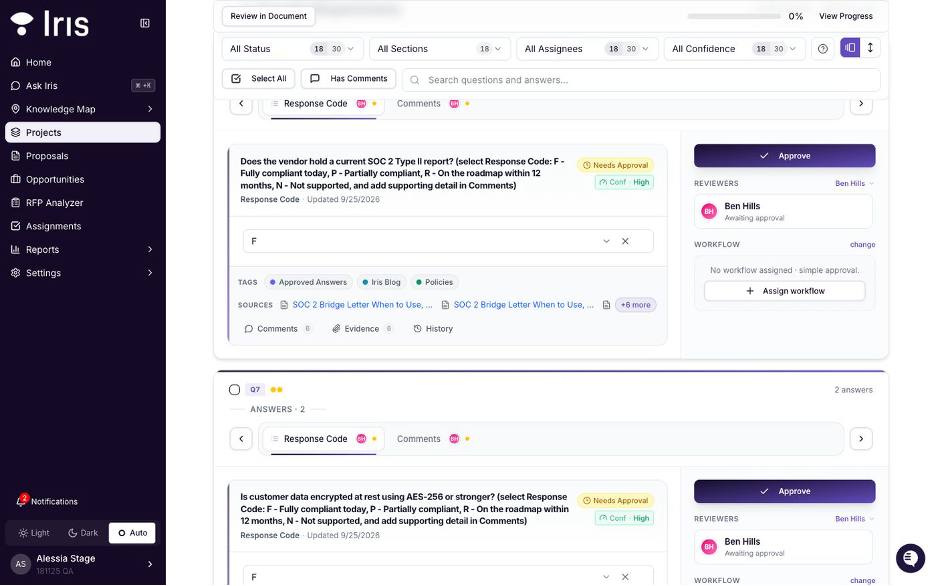
Drop-down answers are a real select. The value is always one of the document's own options, or empty. Iris never invents a value. If your sources do not clearly support one option, the answer is left blank and flagged so a reviewer can choose.
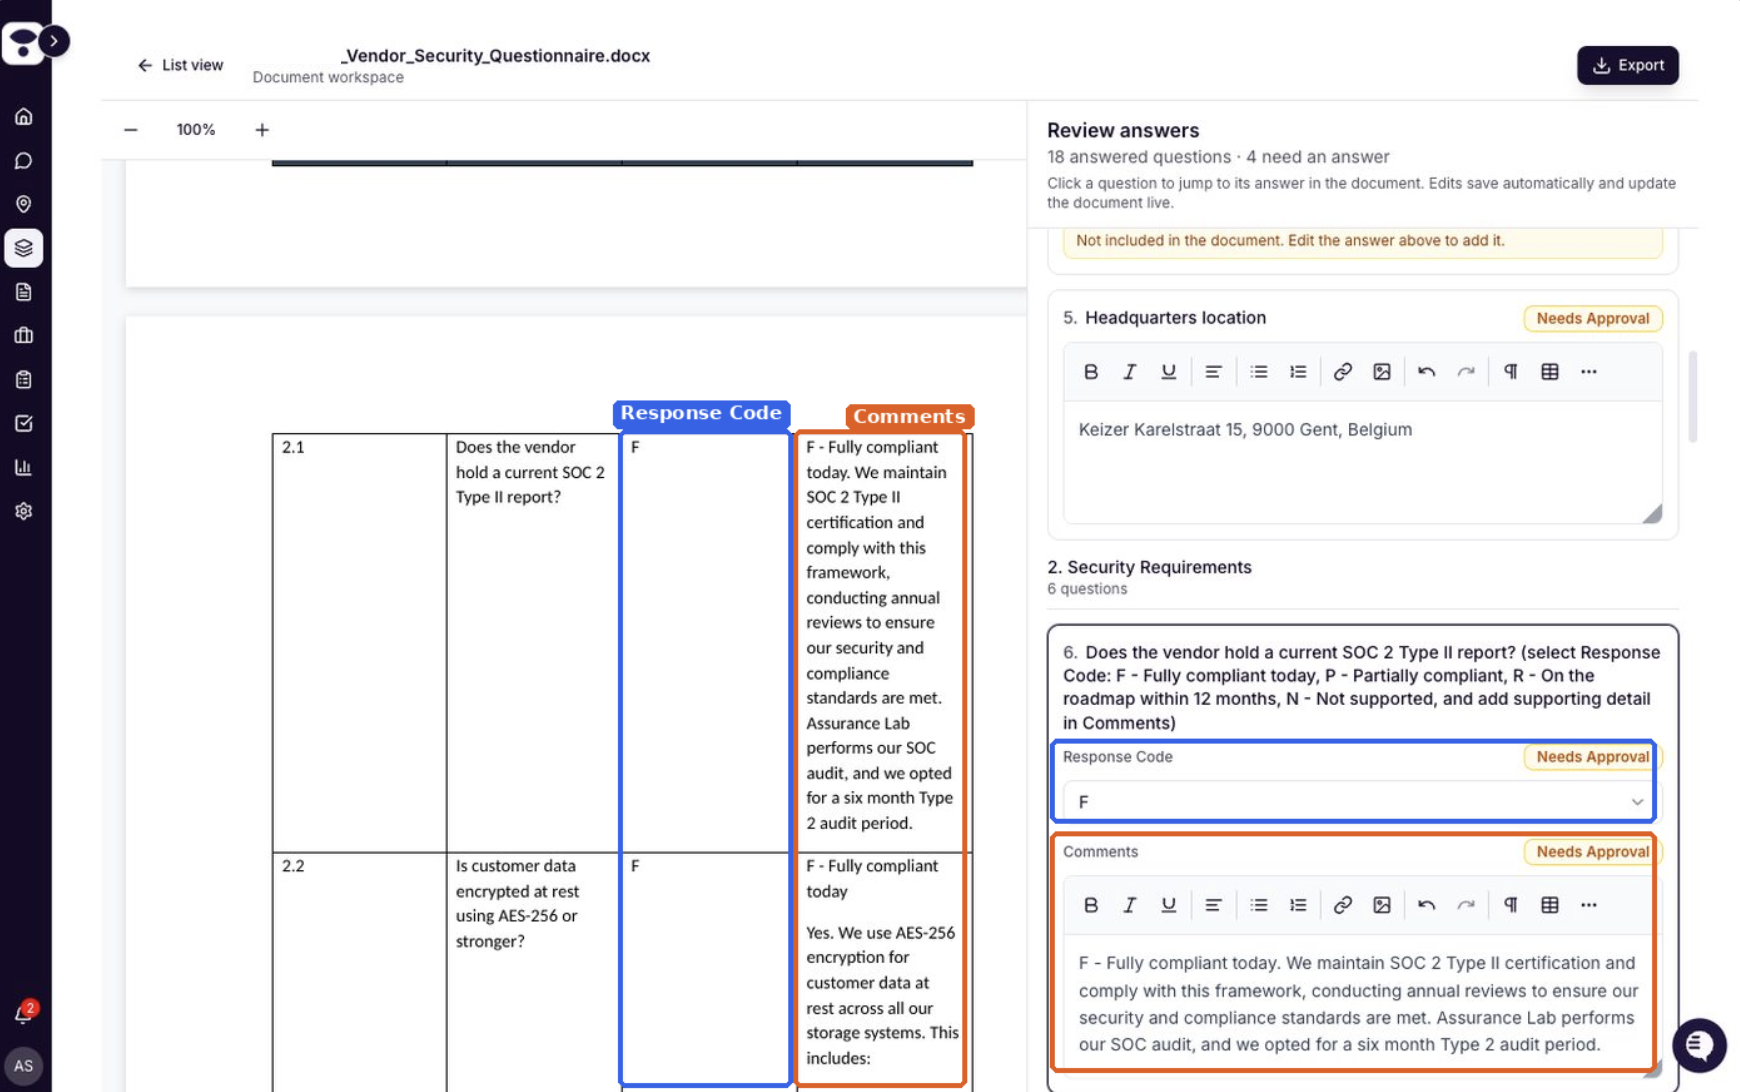
One question can have several answers. For example, a row with a Response Code and a Comments column shows as one question with two answers. Use the tabs above the question card to switch between them. Each answer has its own approval.
Step 8: Preview the final document with Review in Document
Click Review in Document on the project page to open the Document Workspace. This is your customer's file with every answer already in place, exactly as it will export.
Jump to a question: click it in the Review answers panel on the right.
Edit in the panel: the document updates live and edits save automatically. Your scroll position and zoom are kept while it refreshes.
Check status badges: each answer shows Needs an answer, Needs Approval or Approved. A question Iris could not answer stays in the list, flagged Not included in the document, until you write something.
Change drop-downs: use the same select as on the project page. Only the document's own options are offered, and any value not on the document's list is flagged.
In the preview, ticked checkboxes show as ☒ and their sibling boxes are cleared. Fill-in blanks and list-style Comment and Evidence lines are written in place.
Step 9: Export the finished document
In the Document Workspace, click Export in the top right, then Download DOCX. The file matches the preview, with answers in place and review styling removed. Ticks, drop-down selections and legacy form fields are set natively, so the file behaves in Word as if someone filled it in by hand.
Export option | Use it when |
|---|---|
Include cited files | Your customer wants the source documents behind the answers. They are bundled and sent to you by email. |
Include attachments | Project attachments should go out with the response. |
Native Word comments | You want reviewer comments as Word comments. See the note below. |
Important: The Native Word comments version is generated on the server and does not include edits made in the Document Workspace. Finish your edits before exporting with this option, or leave it off.
Adding questions later with Re-stage
If your customer sends a revised questionnaire, or Iris missed a few questions the first time, you do not need to start over.
On the project page, open More Actions and choose Re-stage Project.
The staging screen opens. Every question the project already has is locked with an Existing badge, and its marks are dimmed.
Mark or add only the new questions. The counter at the bottom shows how many will be added.
Click Add New Questions.
Existing answers and approvals are not touched, and Iris skips anything that would duplicate a question the project already has.
Need help?
If you have questions about the staging area or this article, contact your Iris customer success team.