Preparing an Excel Questionnaire in the NEW Staging Area
Last updated: October 8, 2026
A guide to Excel Staging v2: automatic annotation, AI chat, and manual review
What is the staging area?
When you upload an Excel questionnaire or RFP, Iris needs to know which cells are questions, where the answers go, and which cells hold dropdowns, headers, sections or extra context. The staging area is where that mapping happens, before any answers are generated.
Excel Staging v2 does most of this work for you. Iris scans every sheet as soon as the file opens, marks questions and answer cells automatically, skips sheets that are not questionnaires, and reports what it found in a chat panel. You check the result, fix anything that needs fixing by hand or by asking Iris in plain English, and click Start Project.
Excel Staging v2 is turned on per organization. If you still see the older staging screen, ask your Iris contact to enable it. |
Everything that is new in Excel Staging v2
Automatic annotation
Annotation starts by itself the moment the workbook opens. It runs on Iris servers, sheet by sheet in parallel, on an upgraded AI model, so it finishes faster and keeps going even if you close the tab.
Every sheet is classified first. Instruction pages, evaluator scoring sheets, reference tables and hidden sheets are skipped, and "see why" explains each decision.
A status pill shows progress and elapsed time, with a cancel button. Each sheet tab carries its own badge: Queued, Scanning, Annotating, "N questions · M answers", Skipped, Not annotated, or a Retry on failure.
Annotate or Re-run AI on one sheet at a time. Marks you made by hand are never overwritten.
Sections and row context (Priority, Category, Guidance columns) are detected automatically.
Identical re-uploads reuse the earlier annotations instantly, with an Annotate from scratch option.
After one manual mark, Iris offers to mark the similar cells in the same column for you.
When several issues are found at once, Iris offers to fix them all automatically.
Iris chat
A chat panel that can mark, unmark and move question, answer, dropdown and header cells, add sections, and set row or shared context from a plain-English request.
Quick prompts for the common fixes: "Answers are in column …", "Re-check this sheet", "Check for sections", "Mark that row as context".
Every change Iris makes shows up as an "Applied changes to N cells" chip with a one-click Undo.
Fix with Iris and Fix all with Iris buttons in the Issues panel.
The chat panel can be hidden, shown again with a Chat button, and dragged wider or narrower.
Marking tools
Undo and Redo for every marking change (up to 50 steps), and Clear sheet with a confirmation that can also be undone.
Live counts on every tool, hover tooltips, and keyboard shortcuts Q, A, D and H.
Mark as Section with a title popover, plus a Sections list that highlights, edits or deletes each section.
Row Context and Shared Context marks, with a linking mode that lets you choose which questions a shared note covers.
Look for users: assign every question from a column of owner names, with a Needs review list for names that do not match.
The spreadsheet
Edit cell text directly in Iris, the same way you would in Excel. Edits autosave to the workbook, and the exported file keeps its original formatting and file details.
Switch free-text answer cells to dropdowns: mark them as Dropdown and type the options in the Add dropdown options dialog.
Existing Excel dropdowns are always kept, including lists built from named ranges, and open as a searchable picker (click the chevron or press Alt + Down).
Merged cells look and behave as in Excel: clicking any part selects the whole merged range, and a merged context cell applies to every question row it covers.
Hidden rows and columns: a Hidden rows/cols button opens a read-only panel listing their contents, so you can see what Iris did not.
Zoom from 10% to 400% (remembered per sheet), a high-contrast colour mode, and sheet tabs that can be minimised into a picker.
The drag-to-fill handle is switched off, so a stray drag can no longer duplicate questions.
Workbooks render more faithfully: formatting that Excel has switched off no longer shows as bold or italic, and dropdowns in workbooks saved by other tools now appear.
Your selection and scroll position are remembered per sheet, and the tool sidebar can be collapsed to give the grid more room.
Upload .xlsx or macro-enabled .xlsm workbooks up to 75 MB. Iris annotates up to 25 sheets per workbook automatically. Macros are removed when you upload an .xlsm file, and it's saved as .xlsx.
Saving, checking and starting
Your draft autosaves. A chip next to Start Project shows Saving…, Saved with a time, Unsaved changes, or Draft restored when you come back later.
If the same draft is edited in another tab or by another person, Iris pauses autosave and lets you choose Keep my changes or Load saved version.
An Issues panel lists orphaned questions, orphaned answers, duplicate question text and rows with several questions, each with a jump-to-cell link, Unmark, and Fix with Iris.
Start Project checks the workbook first and tells you exactly what blocks it. Hovering a greyed-out button shows the reason.
A "N questions need answer placement" chip above the grid jumps straight to questions that still have no answer cell.
Leaving the page with unsaved edits prompts "Your latest changes weren't saved" with Stay on this page or Leave without saving.
Layout choices (collapsed sidebar, hidden chat, high contrast, minimised sheet tabs) are remembered in your browser.
Re-stage an existing project in the same screen to add new questions or answer columns without touching existing answers, approvals or comments.
Supported files: Excel workbooks (.xlsx and .xlsm) up to 75 MB. Macros in .xlsm files are removed on upload and the file is saved as .xlsx, so keep your original if you need them. Re-save Strict Open XML workbooks as standard .xlsx first. CSV and older .xls files open in the classic staging area, and Word and PDF files use a separate outline flow. |
Step 1: Create the project
Open Projects from the left navigation and click Create Project.
Enter the project name, due date and deal owner. Customer name, deal size and description are optional. The description is internal and does not affect answers.
Drop your Excel file into the Upload File area, or click it to browse.
Click Create. Iris uploads the file and opens the staging area.
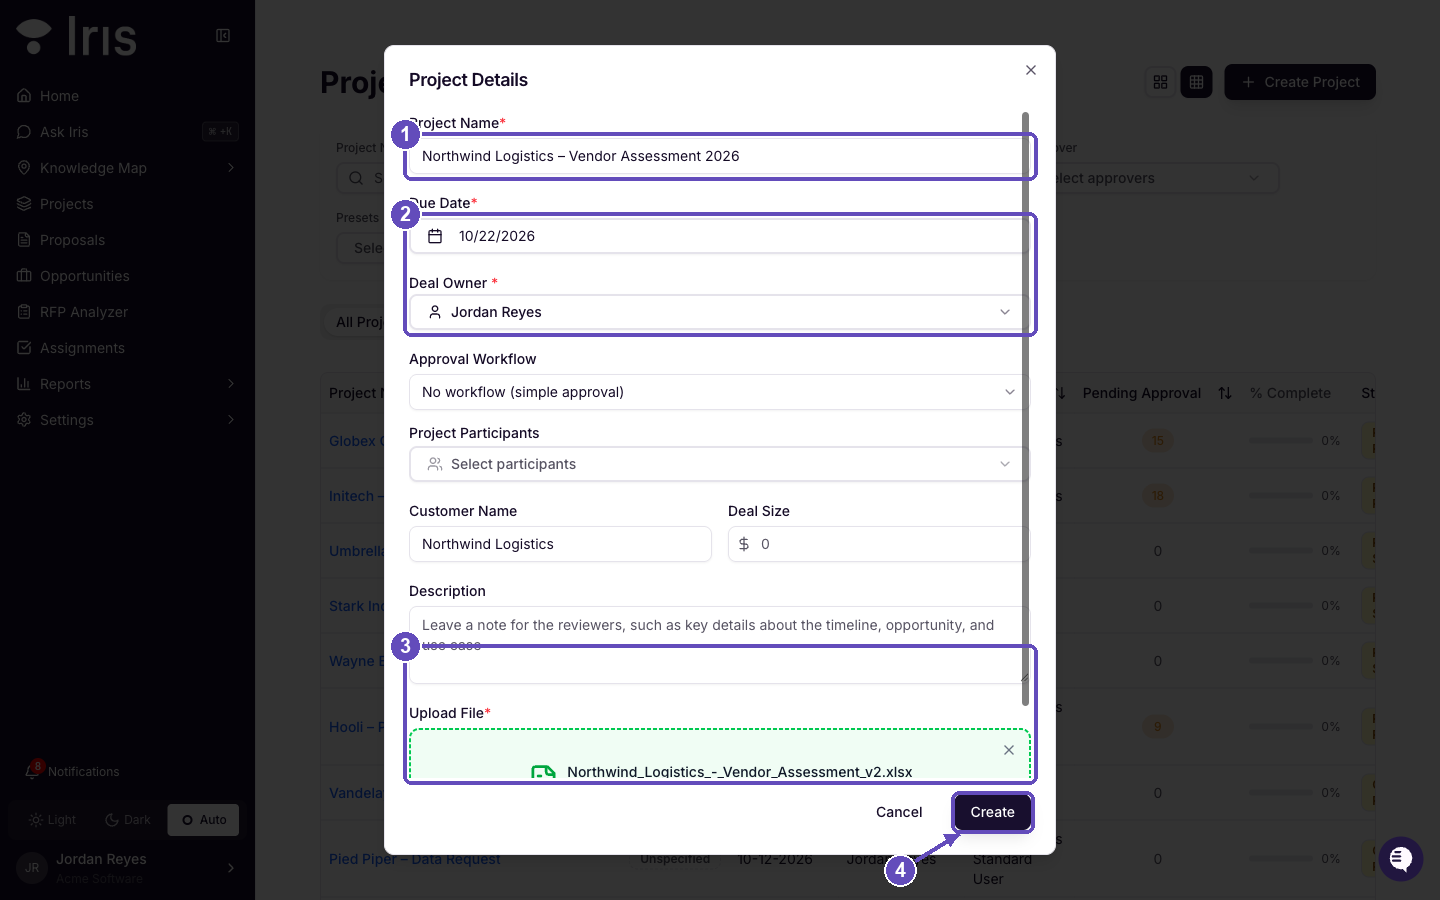
Project Details: (1) project name, (2) due date and deal owner, (3) the attached workbook, (4) Create.
Step 2: Project content details
The staging area opens with the Project Content Details dialog. These settings apply to every question in the project unless you override them for a section later.
Project Preset (optional): applies a saved bundle of tags, instructions and context in one click.
Project Reviewer (required): assigned to the overall project and to every question by default.
Approval Workflow: leave on simple approval, or pick a multi-step workflow.
Additional assignees: everyone listed here is added to every question alongside the reviewer.
Tags (required): decide which Knowledge Map content Iris uses to answer. Your organisation default is pre-selected.
Project Context and custom instructions (optional): background on the opportunity, and how answers should be styled.
Click Next to continue. You can reopen this dialog at any time with the Edit Context button in the top-right of the staging area. If a reviewer or tags are still missing when you click Start Project, the dialog opens again so you can add them.
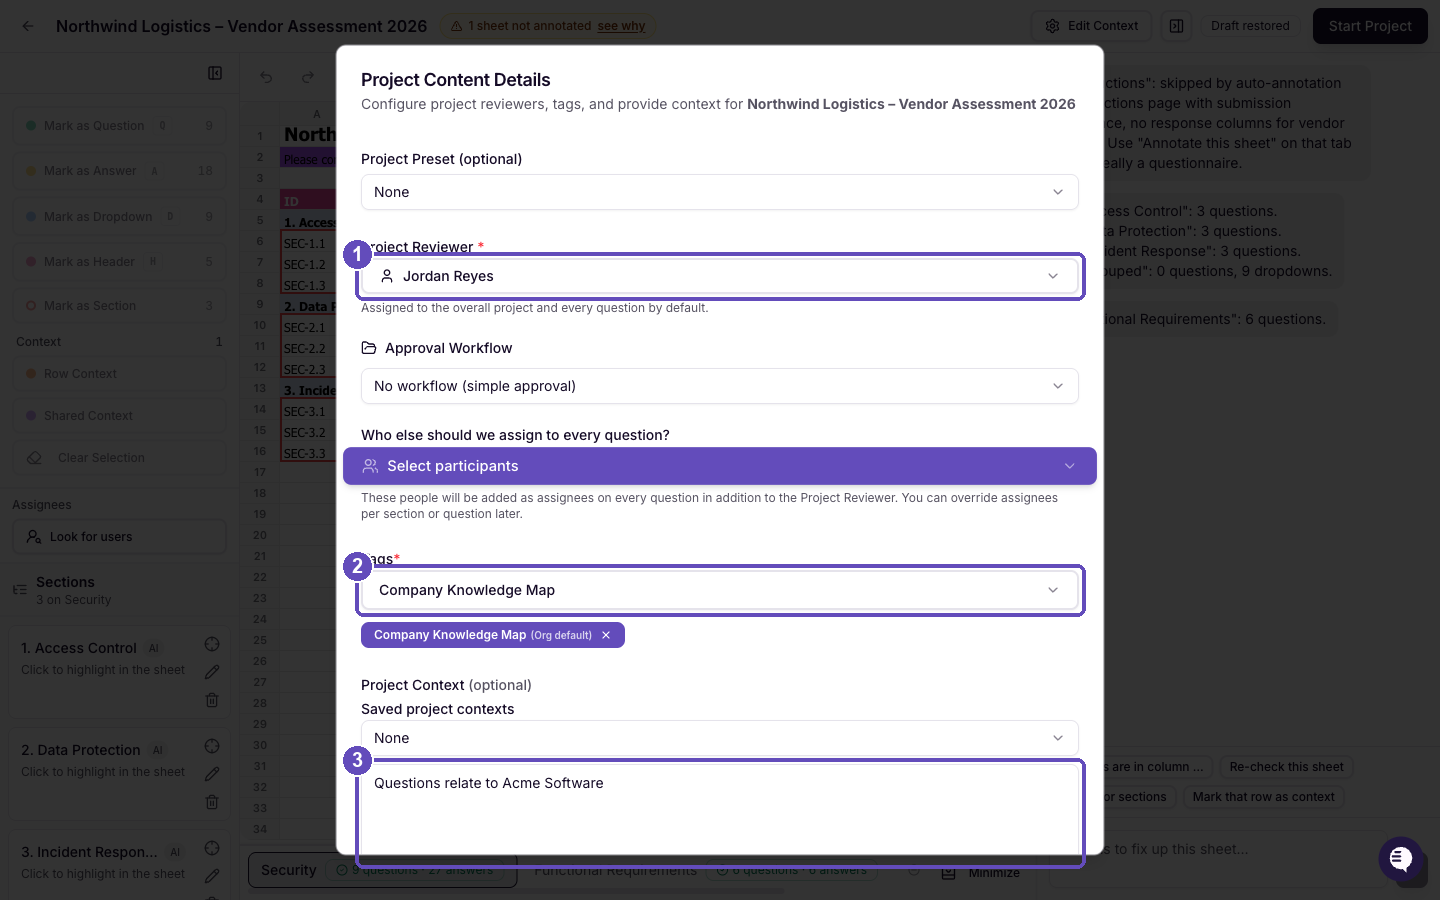
Project Content Details: (1) the project reviewer and (2) tags are required; (3) project context is optional but helps Iris answer accurately.
Step 3: Iris annotates the workbook
While you fill in the project details, Iris is already scanning the workbook on its servers. Each visible sheet is classified first (questionnaire, instructions, evaluator scoring, reference, or other). Only questionnaire sheets are annotated; instruction and reference sheets are read as background context instead. Sheets are processed in parallel, and most workbooks finish in under a minute. You can keep working while it runs, and it keeps going even if you close the tab.
When the run finishes, the sheet tabs along the bottom show what was found on each sheet, and the chat panel posts a summary per sheet, including any sections that were detected.
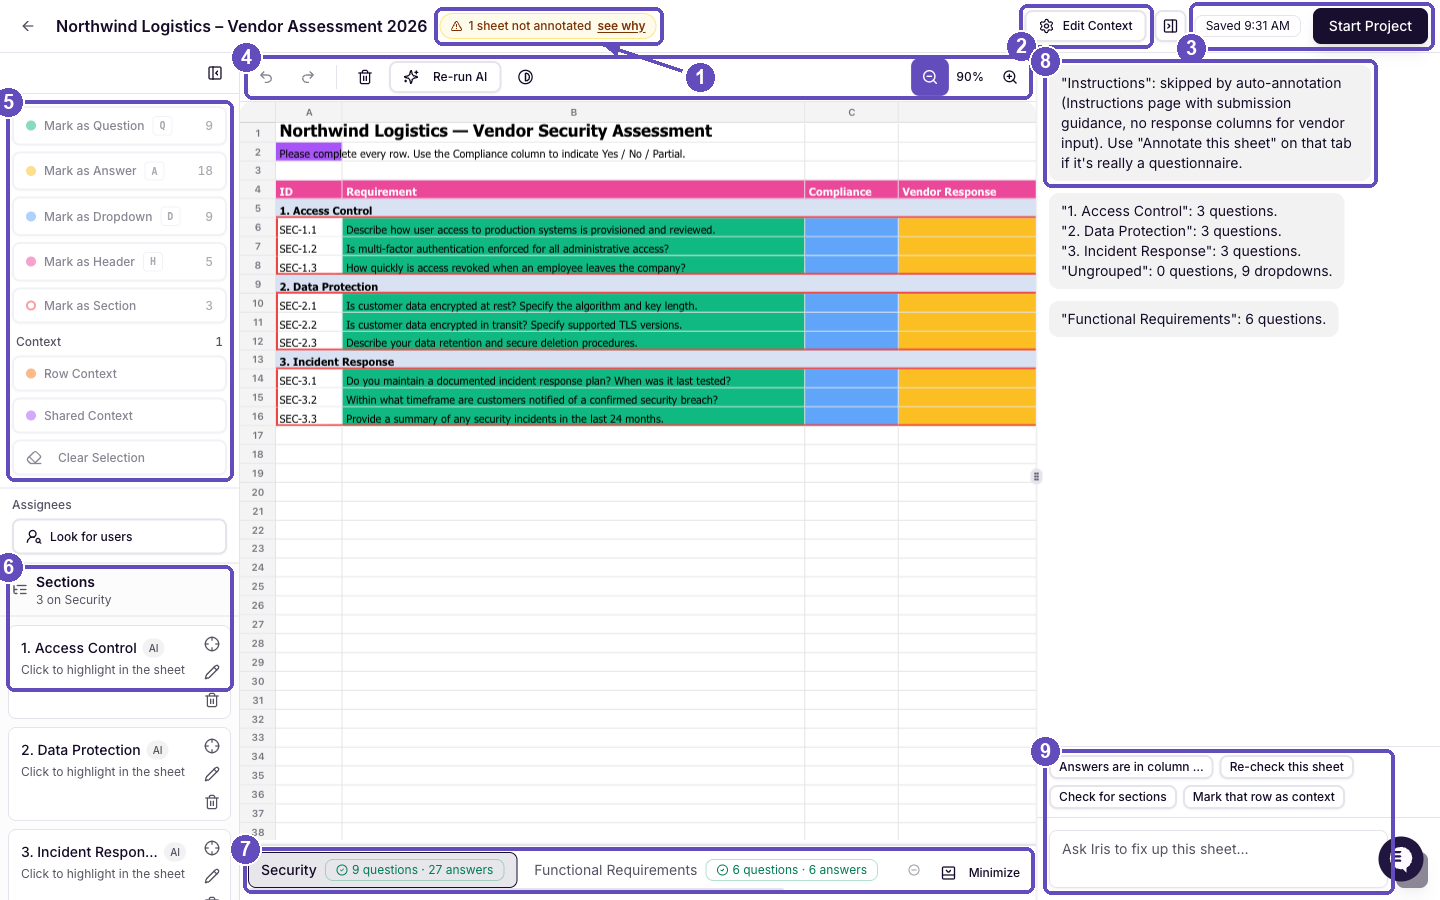
The staging area after automatic annotation: (1) status pill, (2) Edit Context, (3) save chip and Start Project, (4) toolbar, (5) marking tools with counts, (6) Sections panel, (7) sheet tabs with badges, (8) Iris summary, (9) chat input and quick prompts.
What the colours mean
Mark | Colour | Meaning |
|---|---|---|
Question | Green | The text Iris will answer. |
Answer | Yellow | The cell the answer is written into. |
Dropdown | Blue | An answer cell that must use a fixed list of options. |
Header | Pink | A column or group label such as "Requirement" or "Vendor Response". Never extracted as a question. |
Section | Red border | A titled group of questions. Becomes a section on the project page. |
Row context | Orange | Extra instructions for the question on the same row, such as a priority or word limit. |
Shared context | Purple | Notes that apply to several questions you link it to. |
The annotation status pill
Next to the project name, a status pill tracks the run: "Automatic annotation is queued", then "running (X of Y sheets processed)" with the elapsed time and a cancel X, and finally a summary such as "1 sheet not annotated". Click "see why" to see which sheets were skipped and the reason. From that popover you can Open sheet or Re-run AI on it.
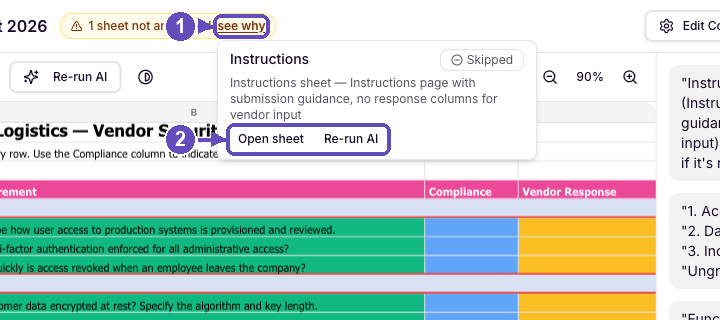
Click (1) "see why" to open the popover. It lists each sheet that was not annotated, with the reason and (2) an Annotate this sheet shortcut.
Sheet tabs and status badges
Badge | Meaning |
|---|---|
Queued / Scanning… / Annotating… X/Y | Iris has not reached the sheet yet, or is still working on it. |
9 questions · 27 answers | Done. Counts of question and answer cells found. The badge turns amber if only the first 2,000 rows could be annotated. |
Skipped | Iris decided this is not a questionnaire (an instructions, scoring or reference sheet), or the workbook is over the automatic sheet limit. Nothing was marked. |
No questions found | The sheet was scanned but Iris found nothing to answer. |
Not annotated | Iris never ran on this sheet, for example because its marks were cleared. |
Red badge with Retry | The run failed on this sheet. Click Retry, or annotate it by hand. |
Open a skipped sheet and the AI button in the toolbar reads Annotate. Click it if the sheet really is a questionnaire. If the sheet already has marks, the same button reads Re-run AI: Iris re-reads the sheet using your marks as context and never overwrites what you marked yourself.
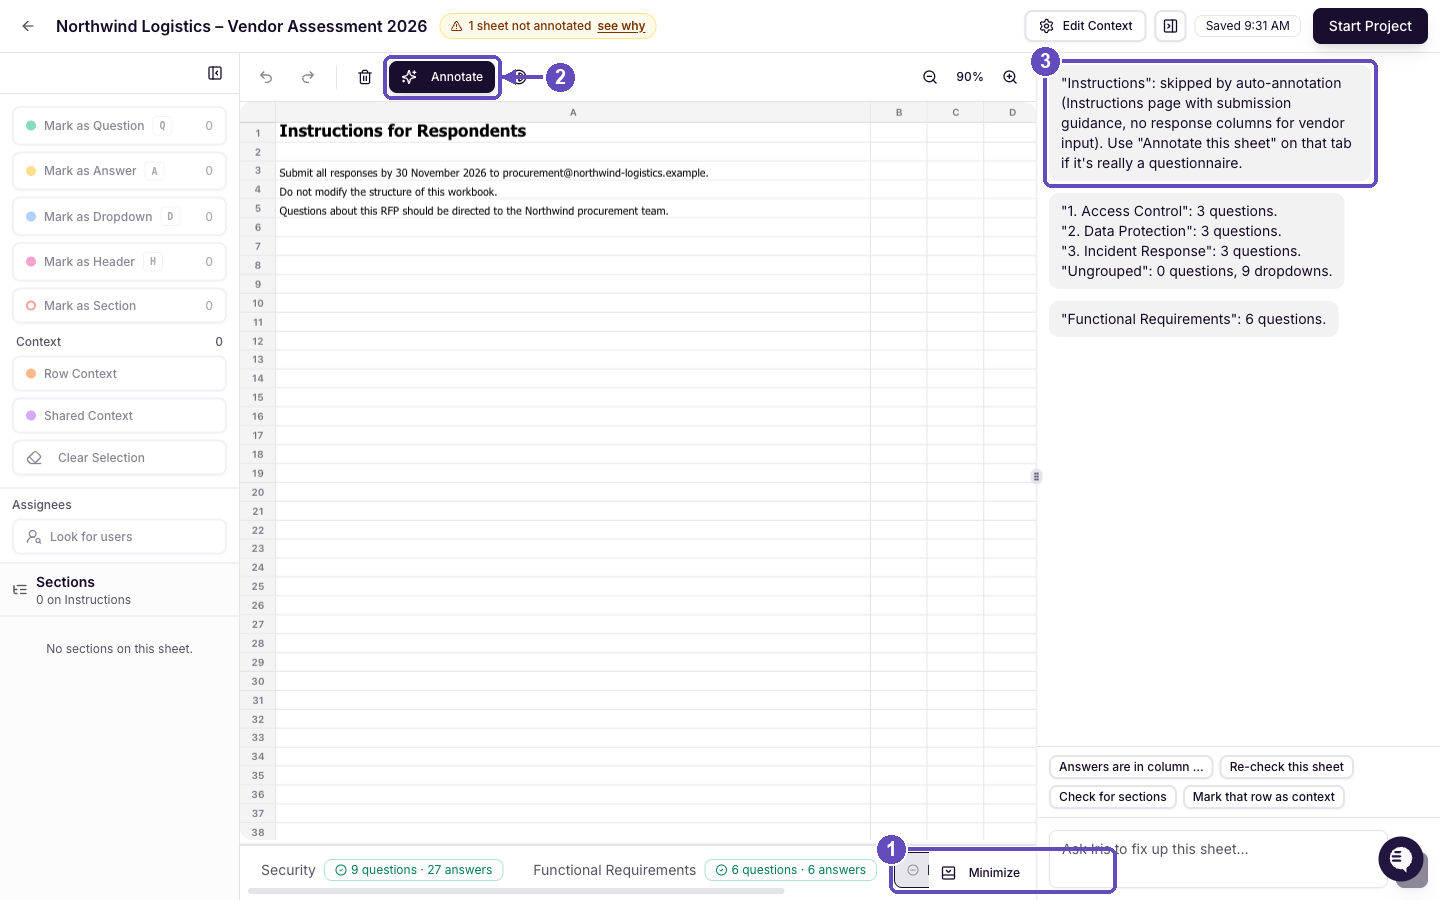
A skipped sheet: (1) the Skipped badge on the tab, (2) Annotate in the toolbar runs annotation on just this sheet, (3) Iris explains in the chat why it skipped it.
Uploaded this workbook before? When a byte-identical copy has already been annotated in your organisation, Iris reuses that result and shows "Reused annotations from an identical earlier upload", with two choices: Keep, or Annotate from scratch. Marks you added yourself are kept either way. |
A tour of the staging area
Marking tools (left panel)
Select one or more cells in the sheet, then click a tool or press its shortcut key. Each tool shows a live count of cells marked on the current sheet, and is greyed out with "Select cells first" until something is selected. Hover any tool for a one-line explanation.
Tool | Key | What it marks |
|---|---|---|
Mark as Question | Q | The text Iris will answer. |
Mark as Answer | A | Where the answer should be written, on the question's row or up to a few rows below it. |
Mark as Dropdown | D | An answer cell that must use a fixed list of options. Iris uses the cell's Excel dropdown; if there is none, you define the options. |
Mark as Header | H | A label above questions, such as "Vendor Response". Headers describe columns and are never extracted as questions. Every answer in that column inherits the label, so Iris knows what kind of response is expected. |
Mark as Section | Draws a titled border around a group of questions so they are grouped under one section in the project. | |
Row Context | Extra instructions that apply only to the question in the same row, such as a priority or word limit. | |
Shared Context | Notes that apply to several questions. After marking, you pick which questions the note covers. | |
Clear Selection | Removes every mark from the selected cells. |
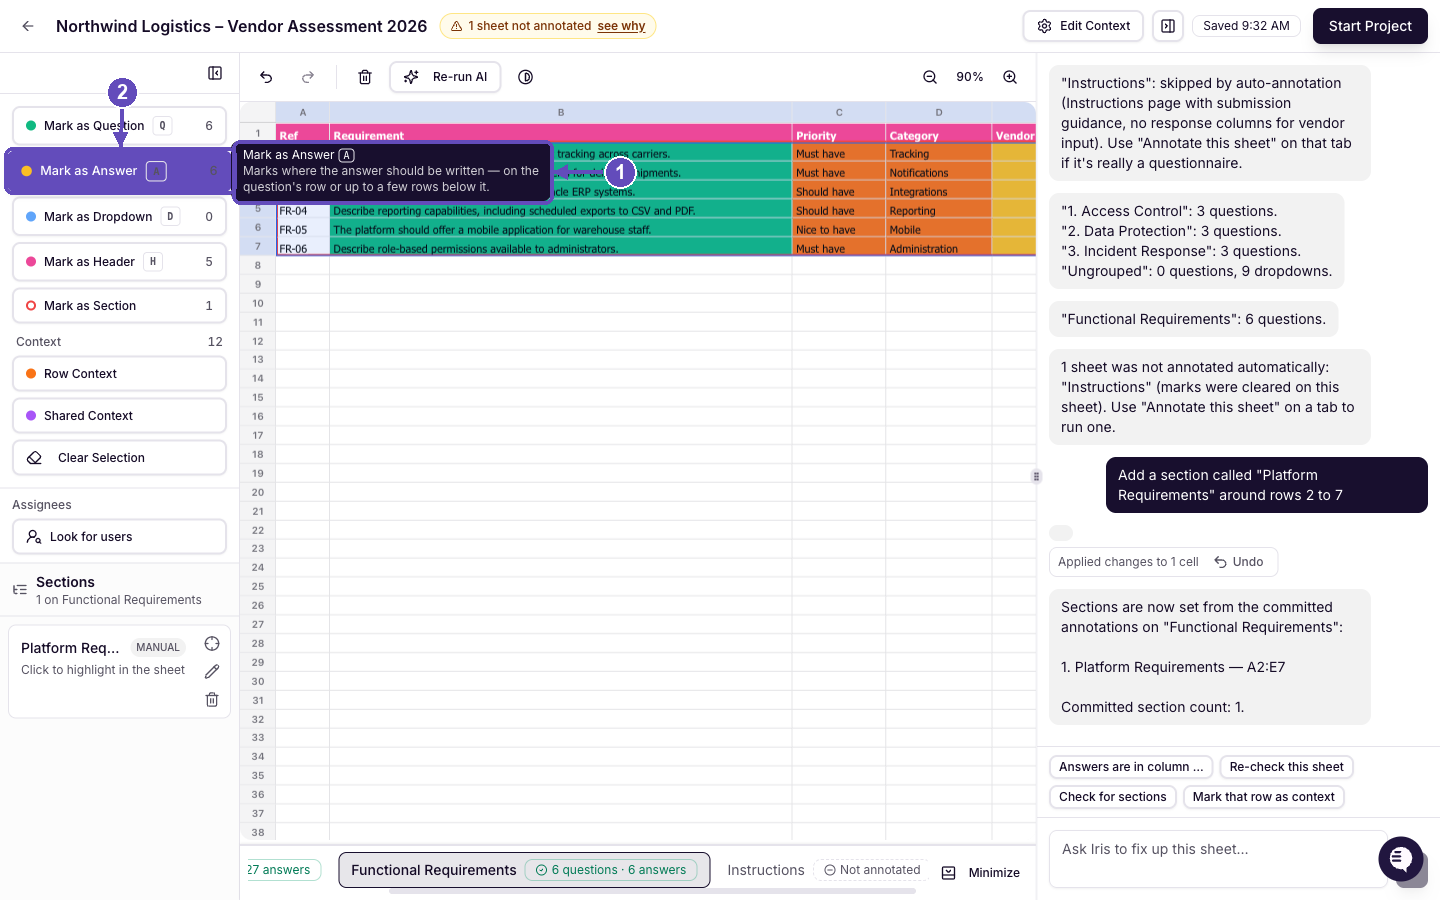
Hover a tool (2) to see what it does (1). Keyboard shortcuts are shown on each tool.
A few rules keep the mapping consistent: a cell can be a question, an answer or a dropdown, but not two of those at once. A header can sit on top of any other mark. Marking a cell as Answer when it already has an Excel list turns it into a Dropdown automatically. Because Q, A, D and H are shortcuts, typing those letters does not start a cell edit; press Enter, F2 or double-click to edit instead.
Top toolbar
Undo / Redo (⌘Z and ⇧⌘Z, or Ctrl on Windows) step through your marking changes. Up to 50 steps are kept.
Clear sheet (trash icon) removes every mark on the active sheet after a confirmation. You can undo it afterwards.
Annotate / Re-run AI runs Iris on the active sheet.
Hidden rows/cols (only shown when the sheet has some) opens a read-only panel listing their contents. Hidden cells are excluded from AI annotation.
High contrast switches the annotation colours to a colour-blind-friendly palette.
Zoom out, reset and zoom in, from 10% to 400%. Zoom is remembered per sheet.
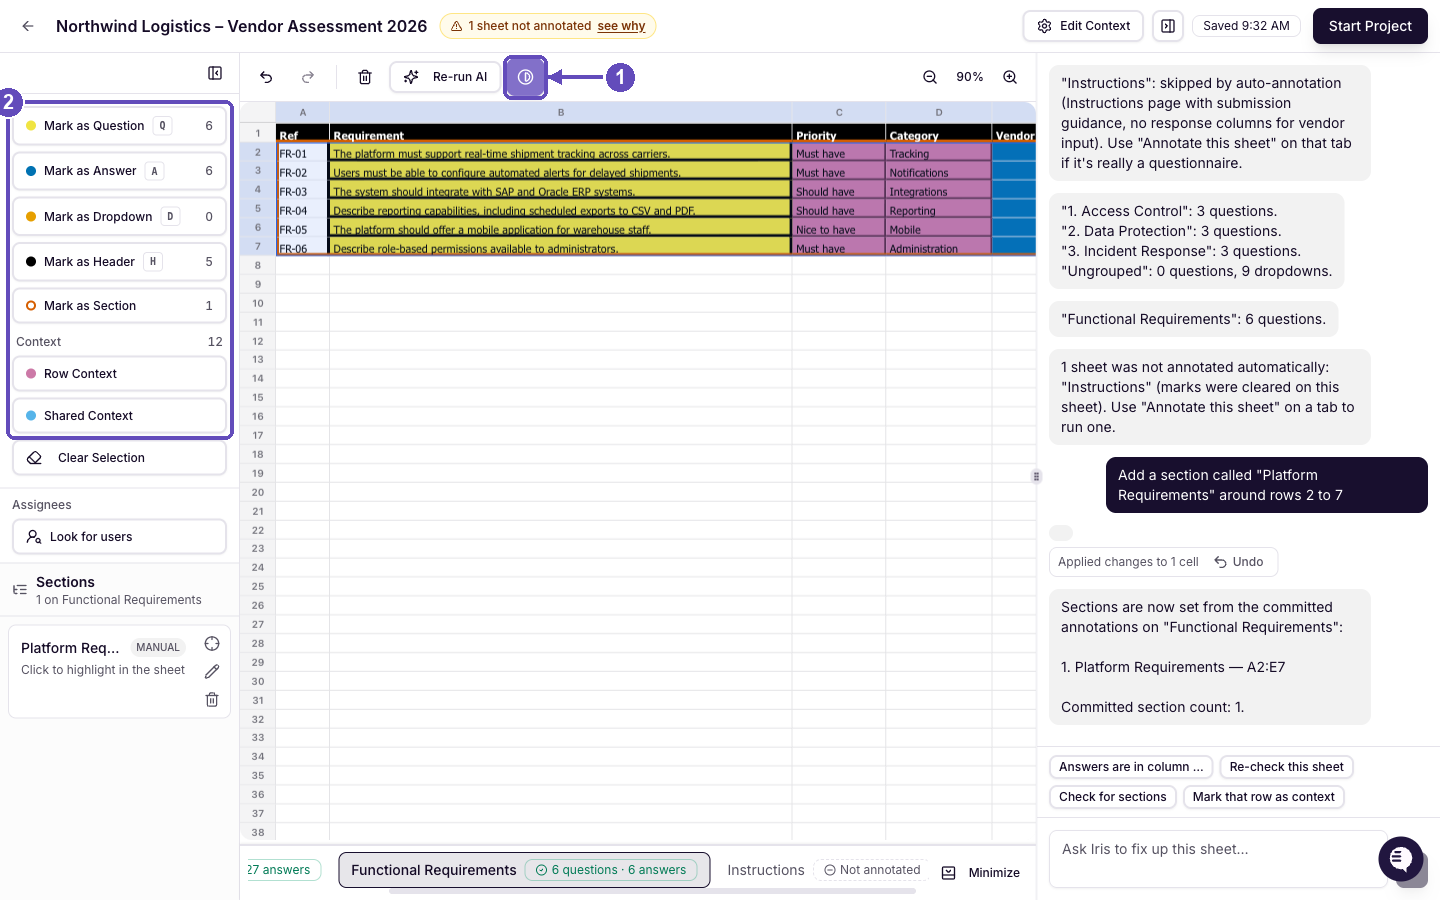
(1) The high-contrast toggle replaces the default palette with stronger, colour-blind-friendly colours; (2) the tool swatches update to match.
Sheet tabs
All visible sheets are listed at the bottom of the grid with their status badge. Click a tab to switch. Minimize collapses the bar into a dropdown picker when a workbook has many sheets.
Sections (left panel, below the tools)
Every section on the current sheet appears as a card, tagged AI or Manual depending on who created it. Click the card to highlight its range in the sheet. The pencil opens the section settings, and the trash icon removes the section (the questions inside it stay).
Iris chat (right panel)
A transcript of what Iris did on each sheet, plus a box where you can ask it to fix things in plain English. Hide it with the panel icon in the header; a Chat button brings it back. The panel can be dragged wider or narrower.
Grid
Click a cell, then Shift-click another (or drag) to select a rectangle. Selection snaps to whole merged cells.
Cell text can be edited: press Enter or F2, or double-click. Edits autosave to the workbook.
Cells with a dropdown show a small chevron and a searchable value picker.
The drag-to-fill handle is turned off on purpose. Dragging a cell across rows used to create duplicate questions.
Step 4: Review and adjust the marks
Automatic annotation gets most workbooks right. Walk each annotated sheet once to confirm questions and answer cells line up: every question needs an answer or dropdown cell on its row, and anything that is not a question should not be green. Fix anything that is off by hand with the tools, or by asking Iris in the chat.
Marking cells by hand
Click the first cell, then Shift-click the last cell of the range (or drag across it).
Click the tool on the left, or press Q, A, D or H.
The cells take on the mark's colour and the tool's count updates.
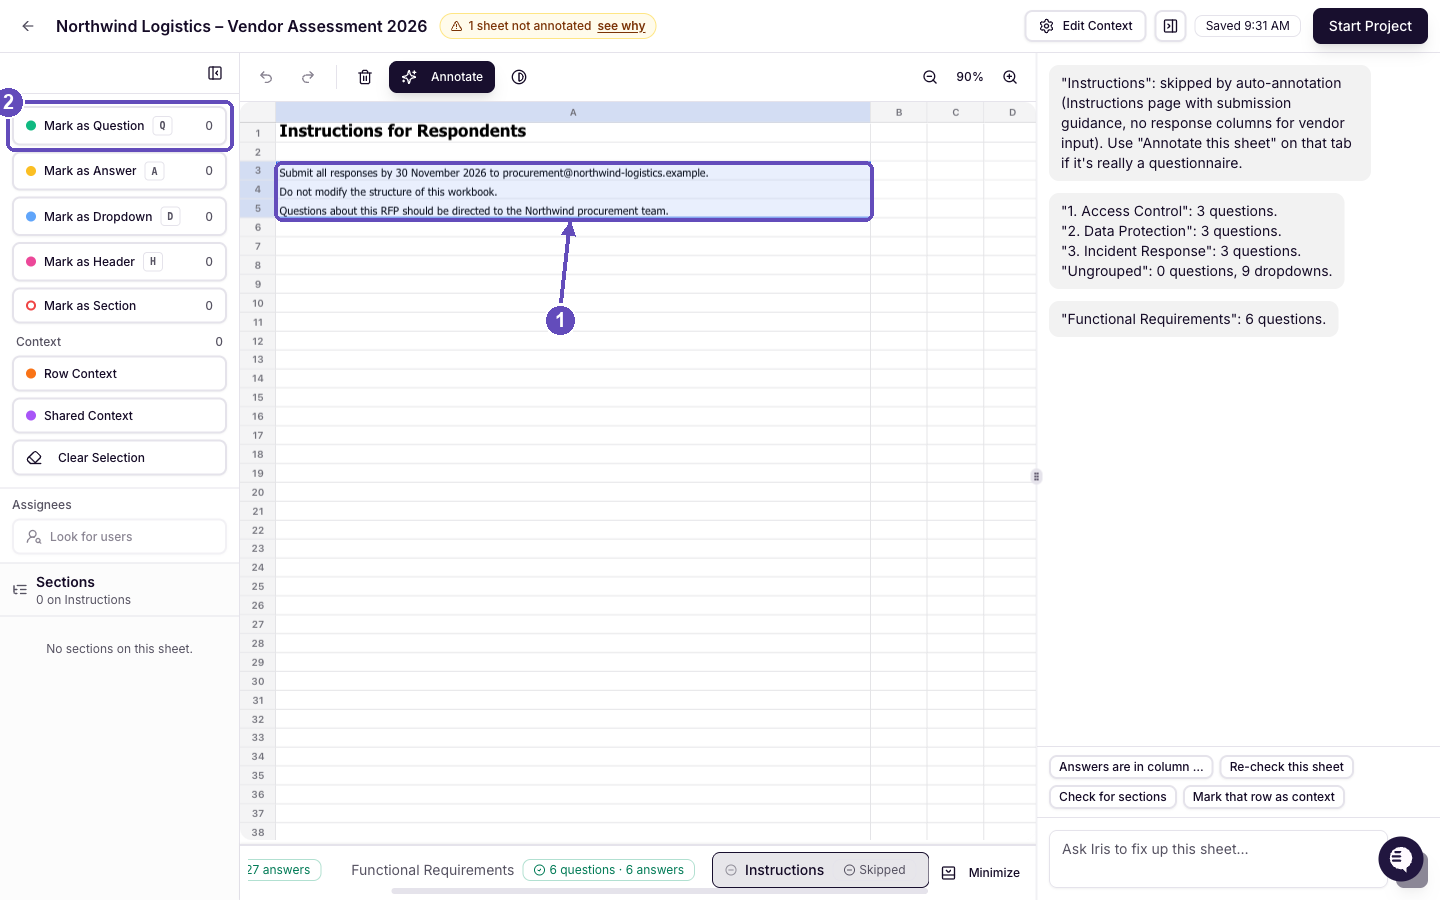
(1) Three cells selected on an unannotated sheet. (2) The marking tools become active as soon as something is selected; press Q or click Mark as Question.
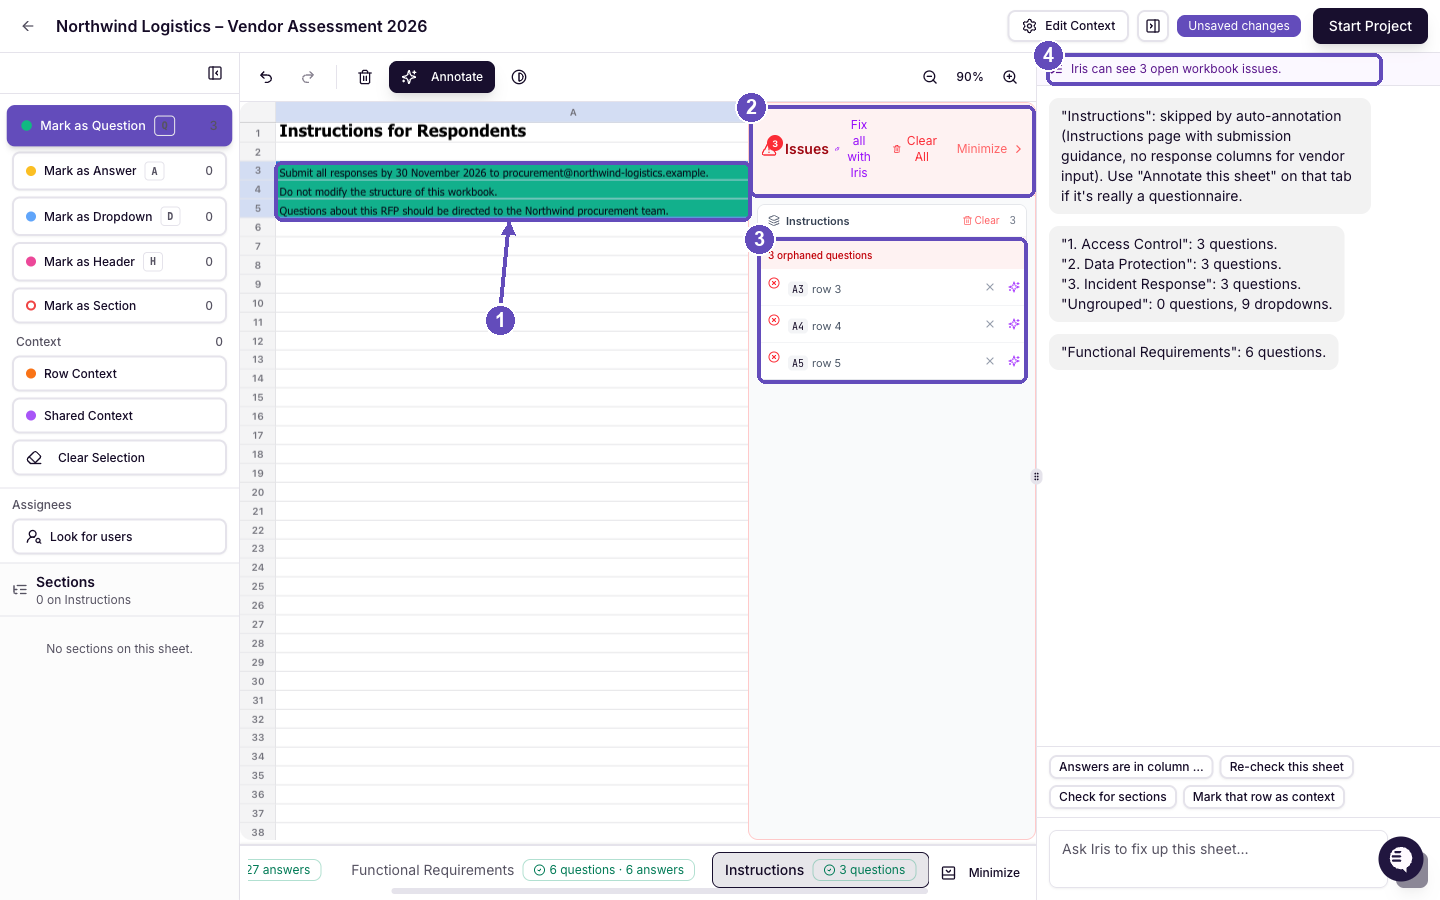
After pressing Q: (1) the cells turn green, (2) the Issues panel opens and (3) lists them as orphaned because they have no answer cells yet; (4) the chat summary counts the open issues.
Column suggestions
When you mark a single cell, Iris offers to mark the similar cells in the same column for you, for example "Marked E2 as answer. Mark 5 similar cells in column E?". Choose Apply, Ask Iris instead, or Dismiss. No AI call is made unless you pick Ask Iris.
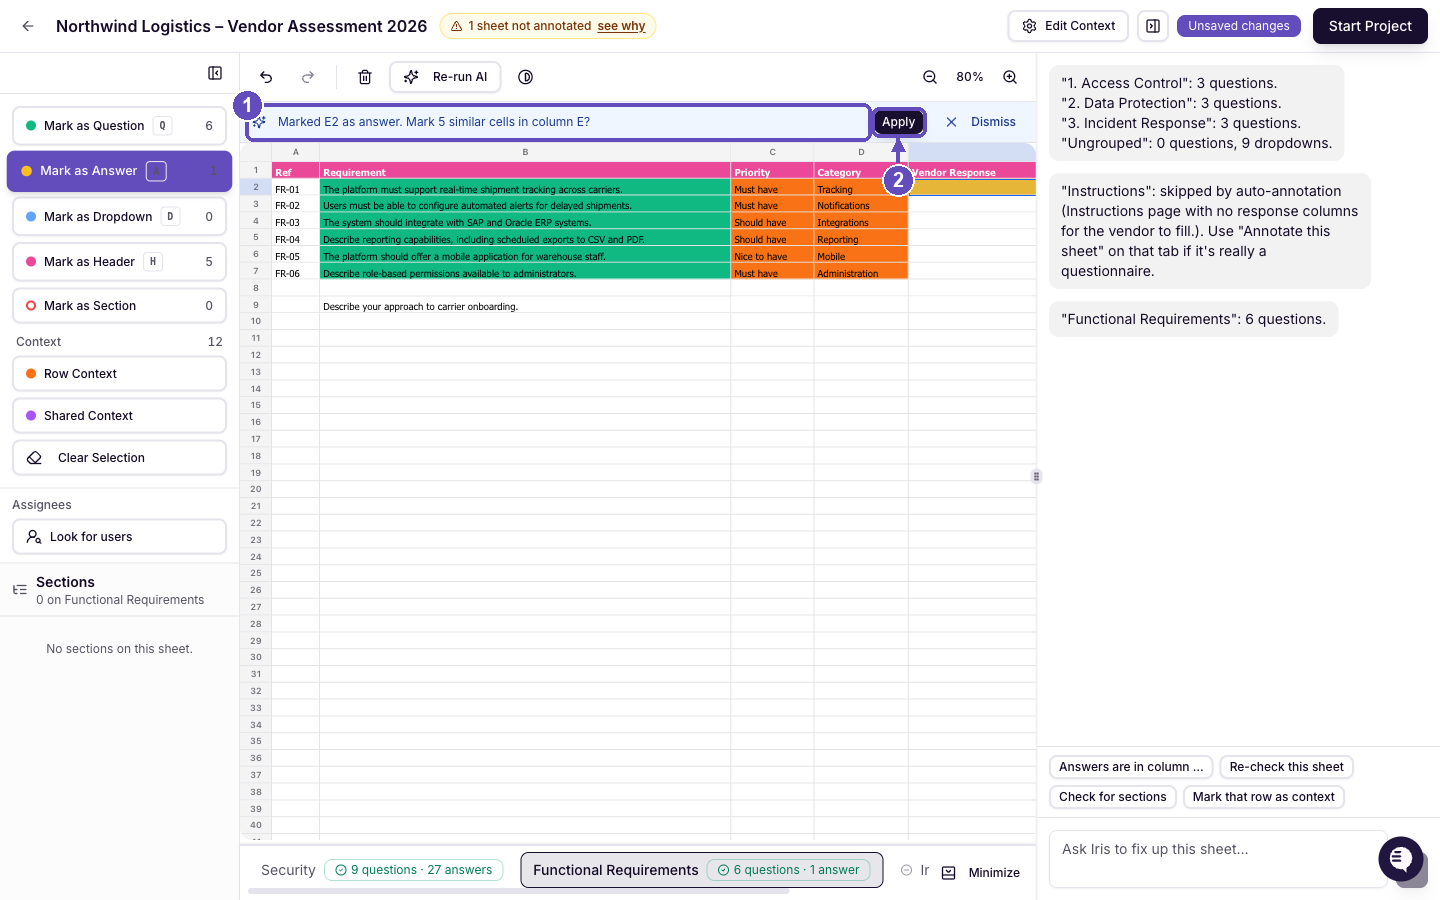
(1) After marking one cell, Iris offers to mark the rest of the column. (2) Apply marks them in one click.
Dropdown cells
When a cell has an Excel drop-down list, Iris marks it blue and uses that list, including lists built from named ranges. Click the chevron on a dropdown cell, or press Alt + Down, to open a searchable list of options, just like in Excel.
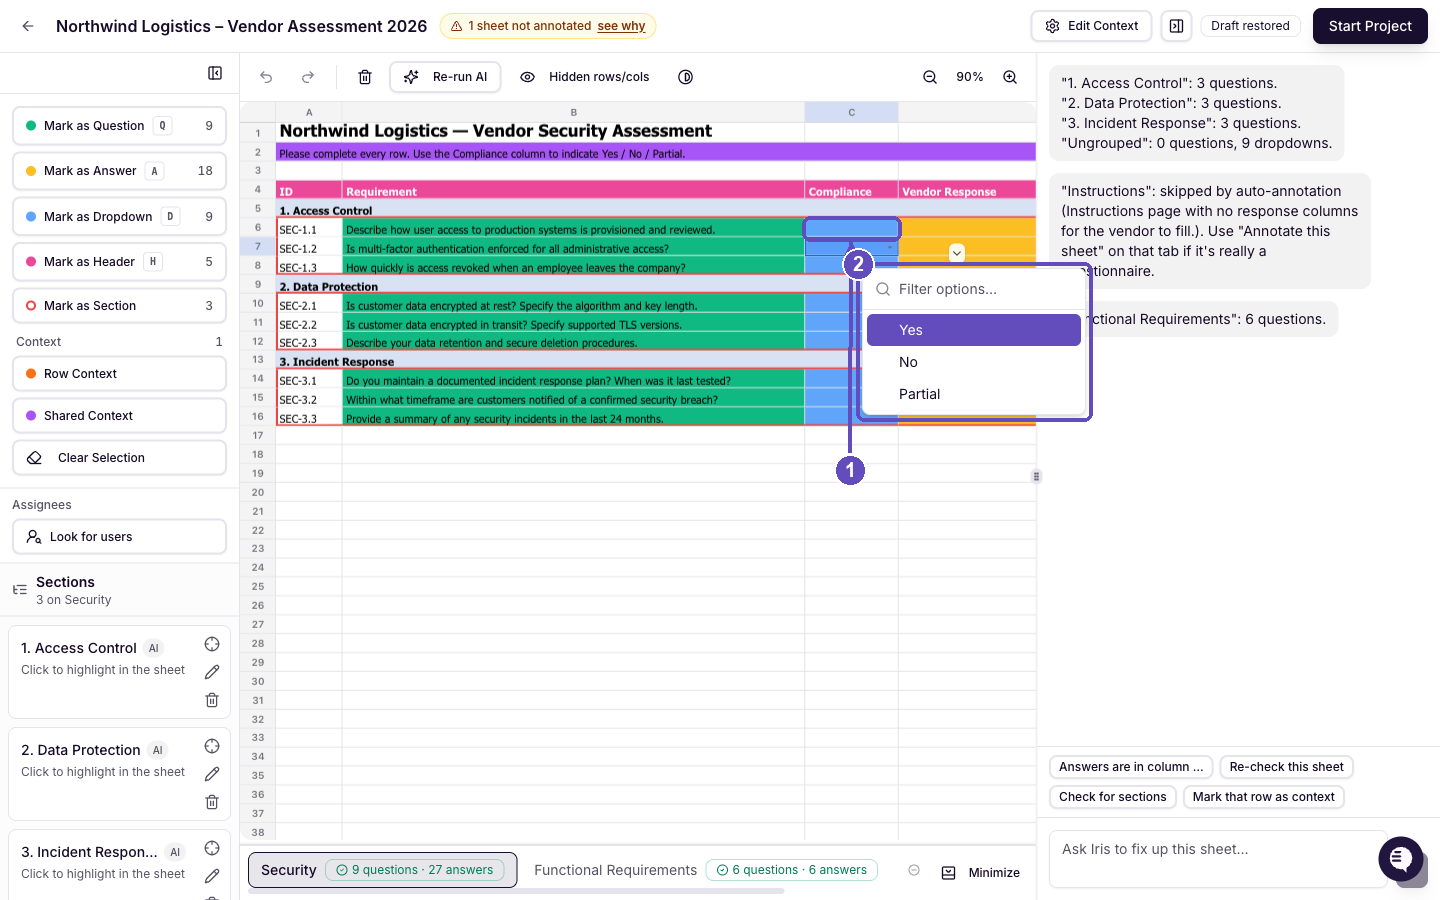
(1) A dropdown cell. (2) The picker lists the Excel options; type to filter and click to set the value.
To turn free-text answer cells into dropdowns, select them and click Mark as Dropdown (or press D). Because the cells have no Excel list, the Add dropdown options dialog opens so you can type the choices. Iris may suggest options based on the column header. The options are stored with the project; the workbook's own formatting is not changed.
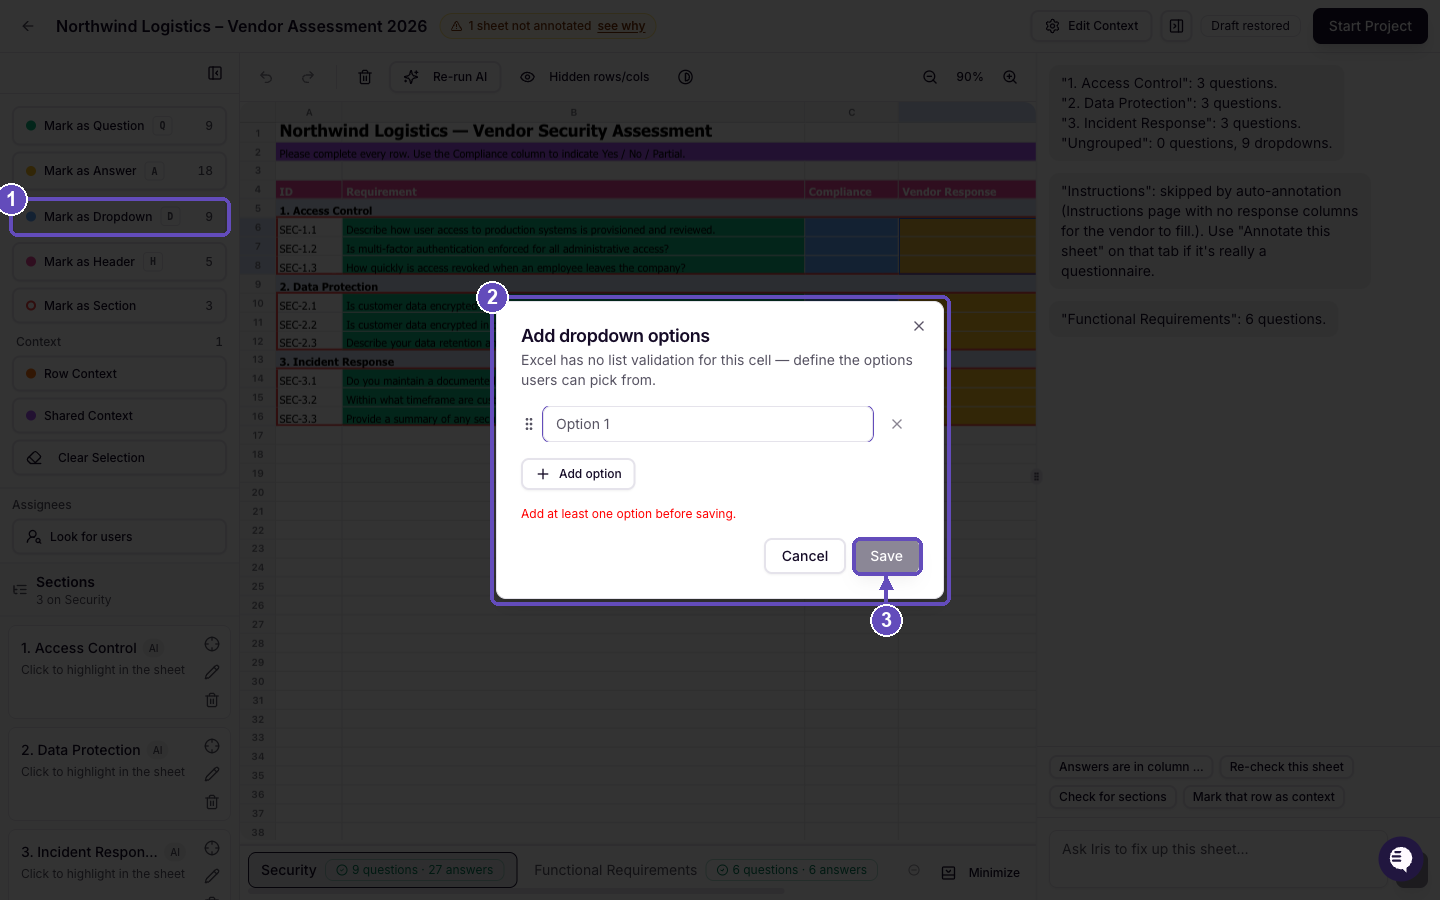
(1) Mark as Dropdown on cells without an Excel list opens (2) the Add dropdown options dialog. (3) Enter one option per line and confirm.
Editing cell text
You can edit cell values directly in the staging area, the same way you would in Excel: press Enter or F2 on a selected cell, or double-click it. Edits are saved to the workbook about a second after you stop typing, and the save chip shows Saving… then Saved. When you export the finished project, the file keeps its original formatting and file details.
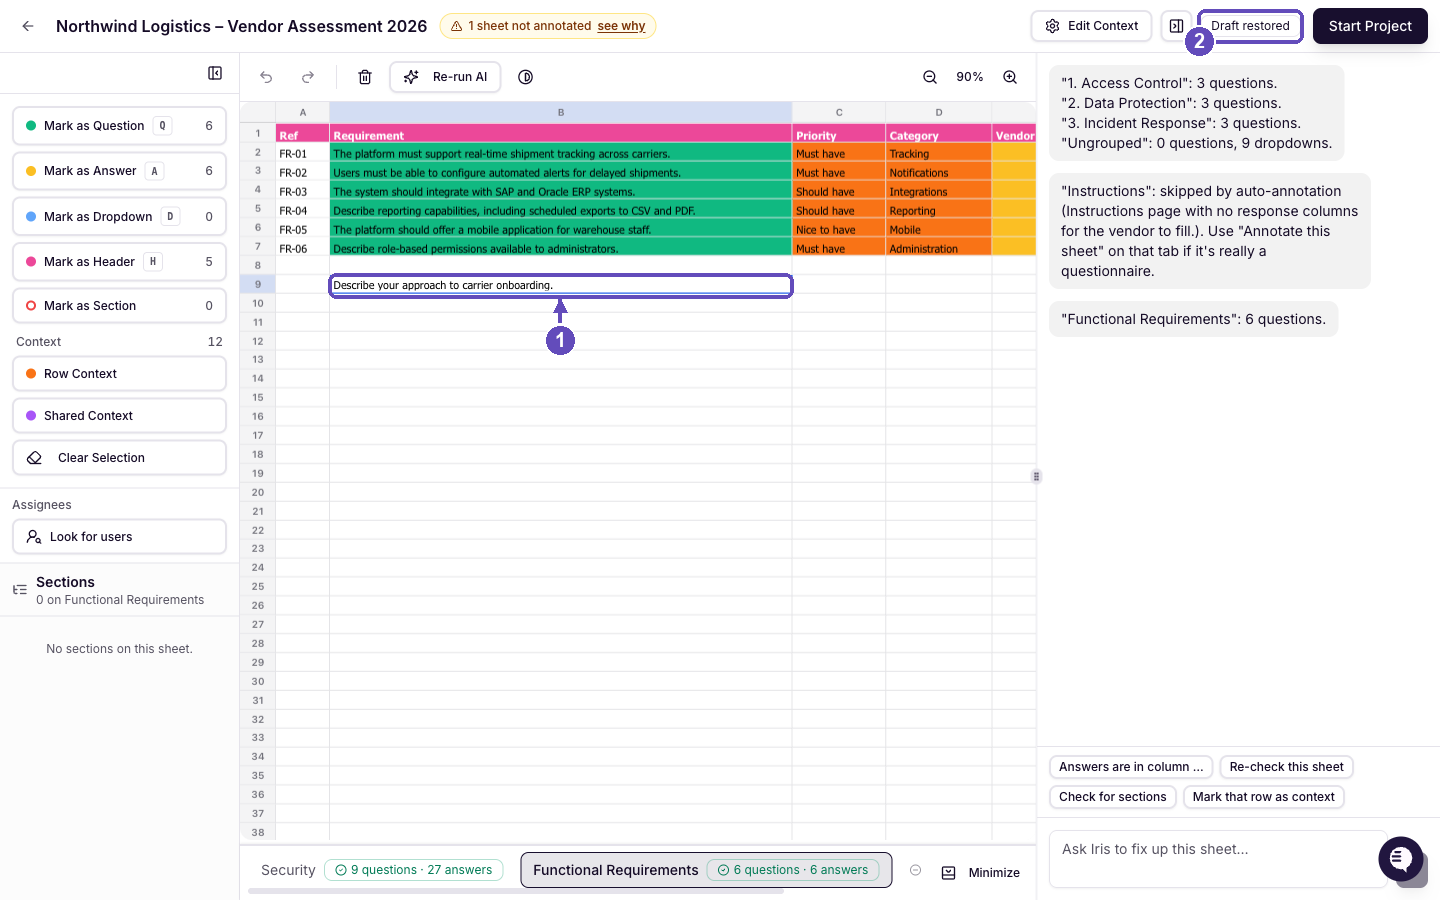
(1) Editing a cell in place. (2) The save chip confirms when the workbook has been saved.
Merged cells
Merged cells look and behave the way they do in Excel. Clicking any part of a merged cell selects the whole merged range, and a mark applies to the whole range. If you mark a merged cell as row context, every question row it covers gets that context.
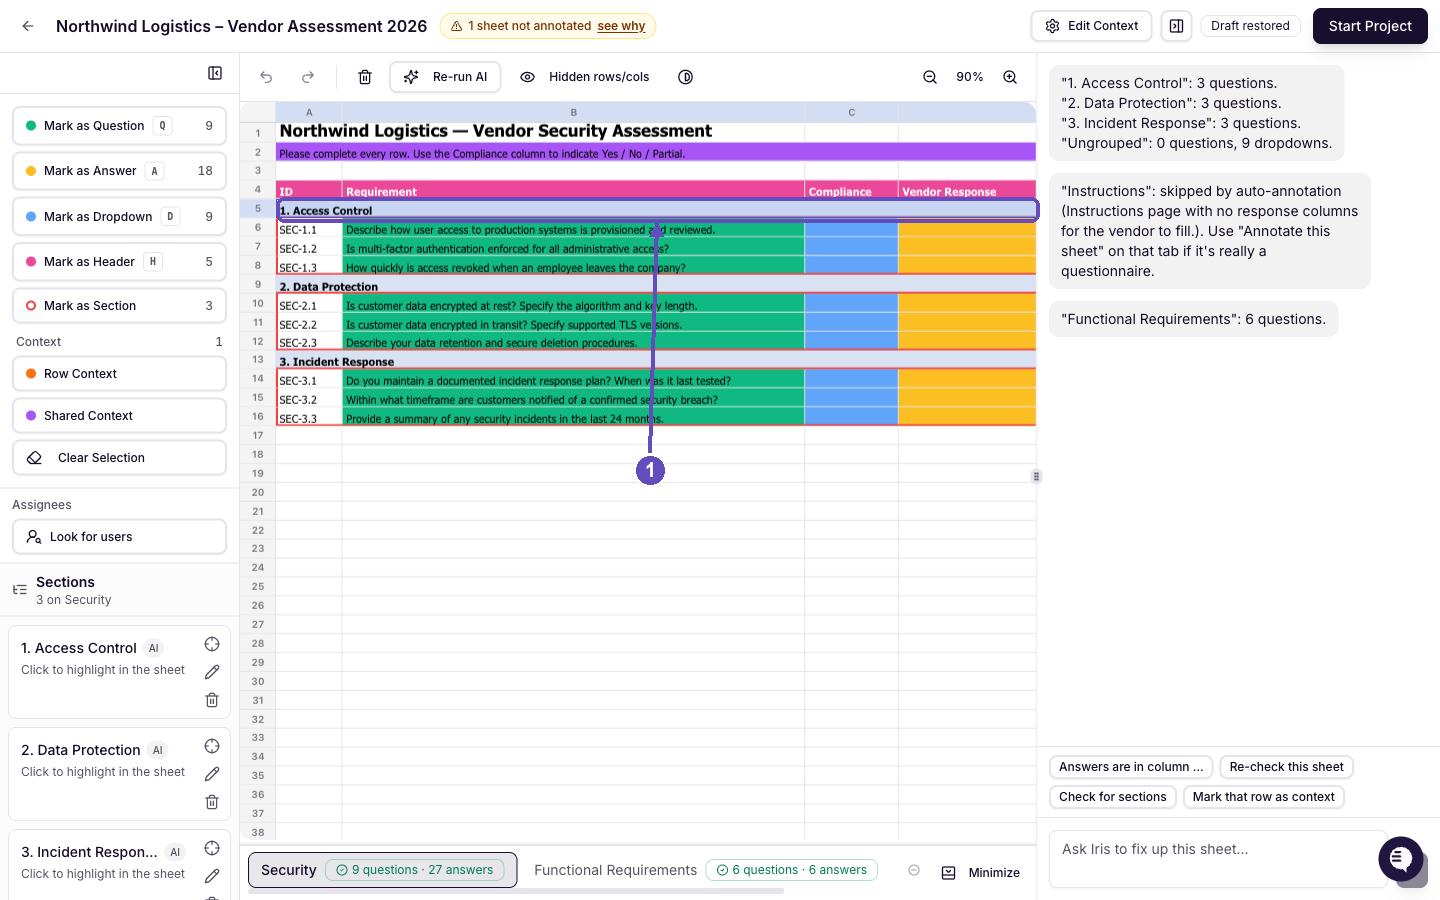
(1) Clicking the section title selects the whole merged row A5:E5.
Hidden rows and columns
Hidden cells are excluded from automatic annotation. When a sheet has hidden rows or columns, a Hidden rows/cols button appears in the toolbar and opens a read-only view of their contents, so you can decide whether anything there matters. To include hidden data in the project, unhide it in Excel and upload the workbook again.
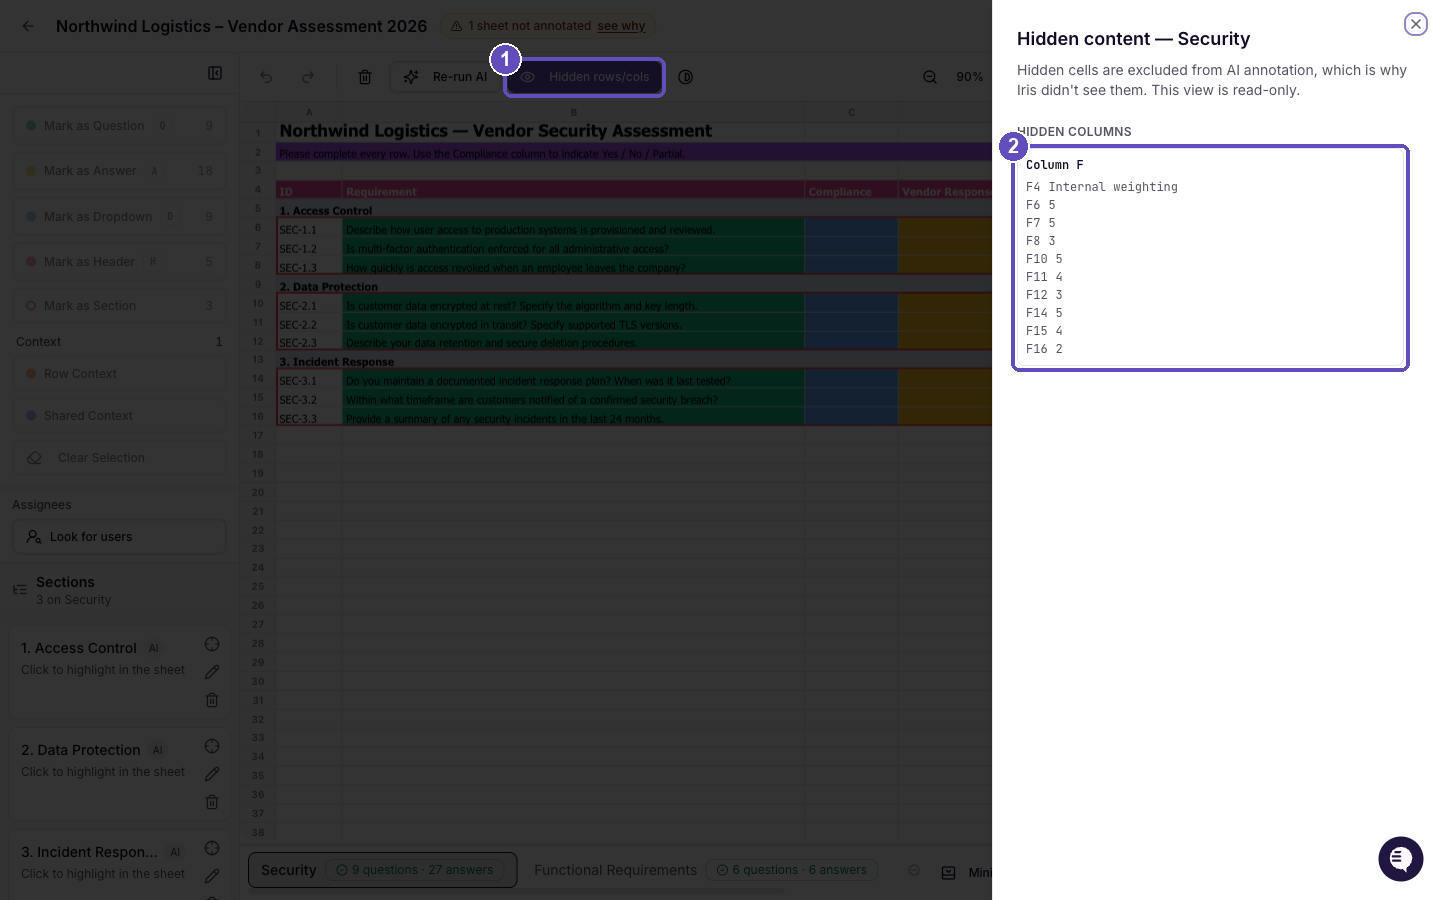
(1) The Hidden rows/cols button appears only when the sheet has hidden content. (2) The panel lists each hidden column and row with its values; here column F holds an internal weighting the vendor was not meant to see.
Context cells
Many questionnaires carry columns such as Priority, Category or Guidance next to each question. Mark those cells as Row Context so Iris reads them when answering that row. Automatic annotation often detects them on its own, as on the Functional Requirements sheet below.
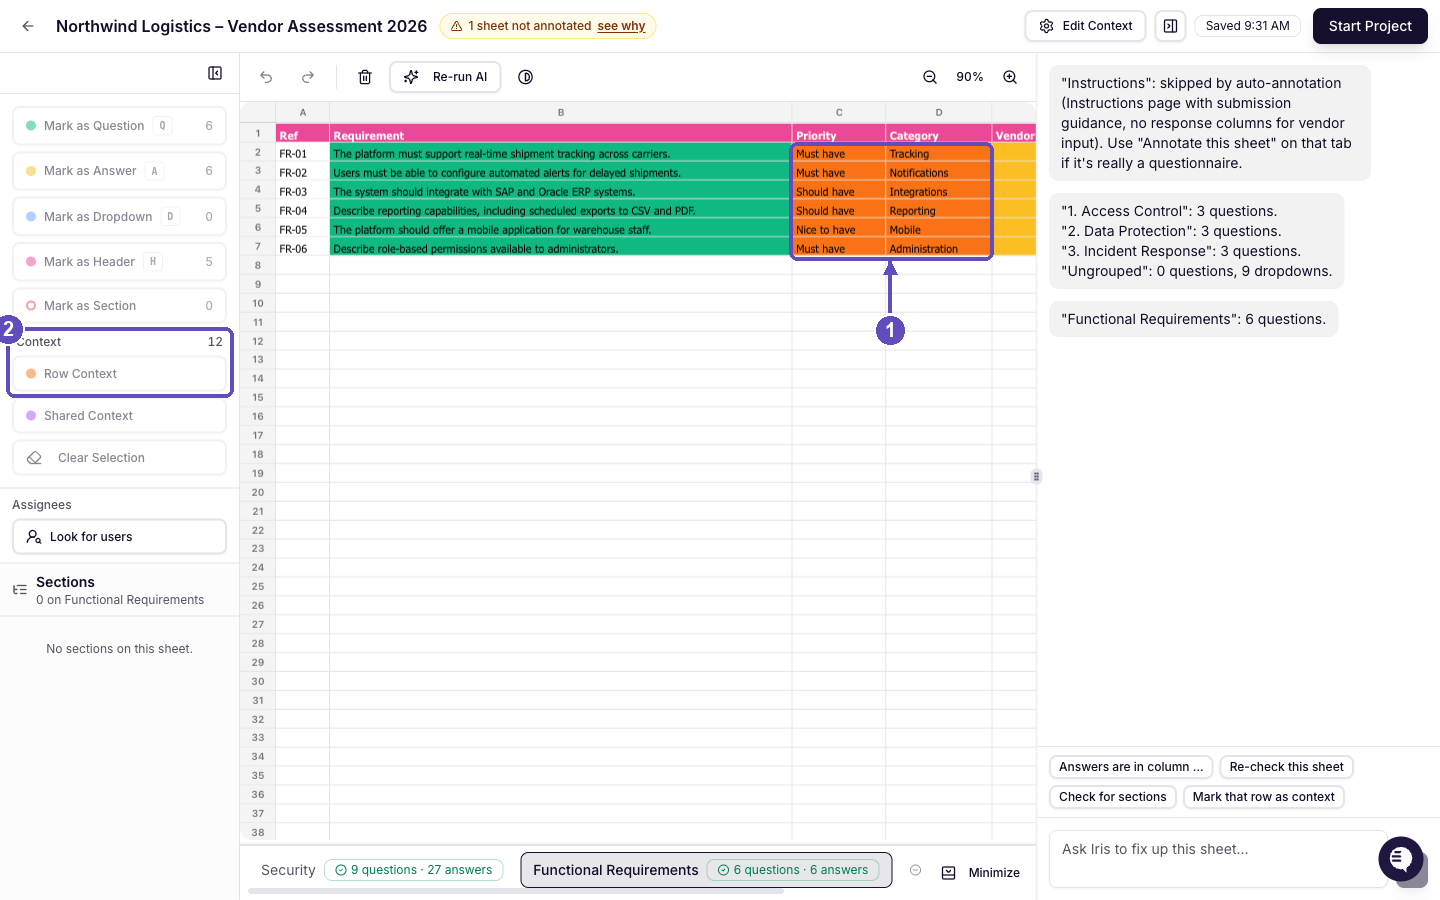
(1) The Priority and Category columns were detected as row context (orange) and are passed to Iris with each question; (2) the Context counter shows how many cells carry context.
Shared Context is for notes that apply to several questions, such as an instruction row at the top of a sheet. Select the note, click Shared Context, then click the question cells it covers and press Link to Selected Questions.
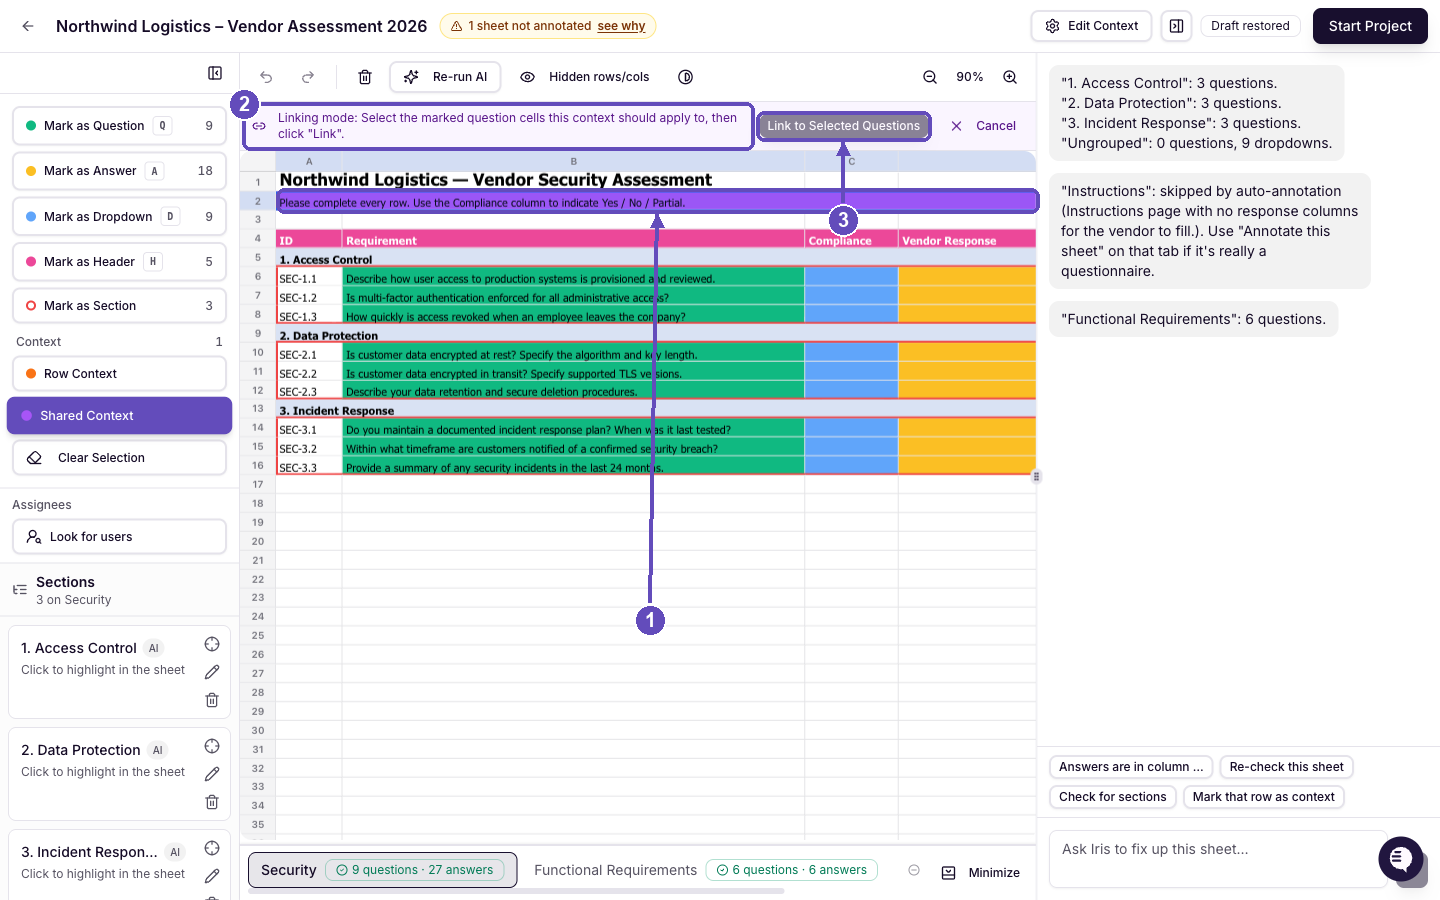
(1) The instruction row marked as Shared Context. (2) Linking mode asks which questions the note applies to; (3) Link to Selected Questions finishes the link.
Sections
Select the question cells, click Mark as Section and give it a title (leave it blank for an untitled section). Sections become the groups on the project page. Note that Clear Selection on cells inside a section also removes that section; use Undo if that was not intended.
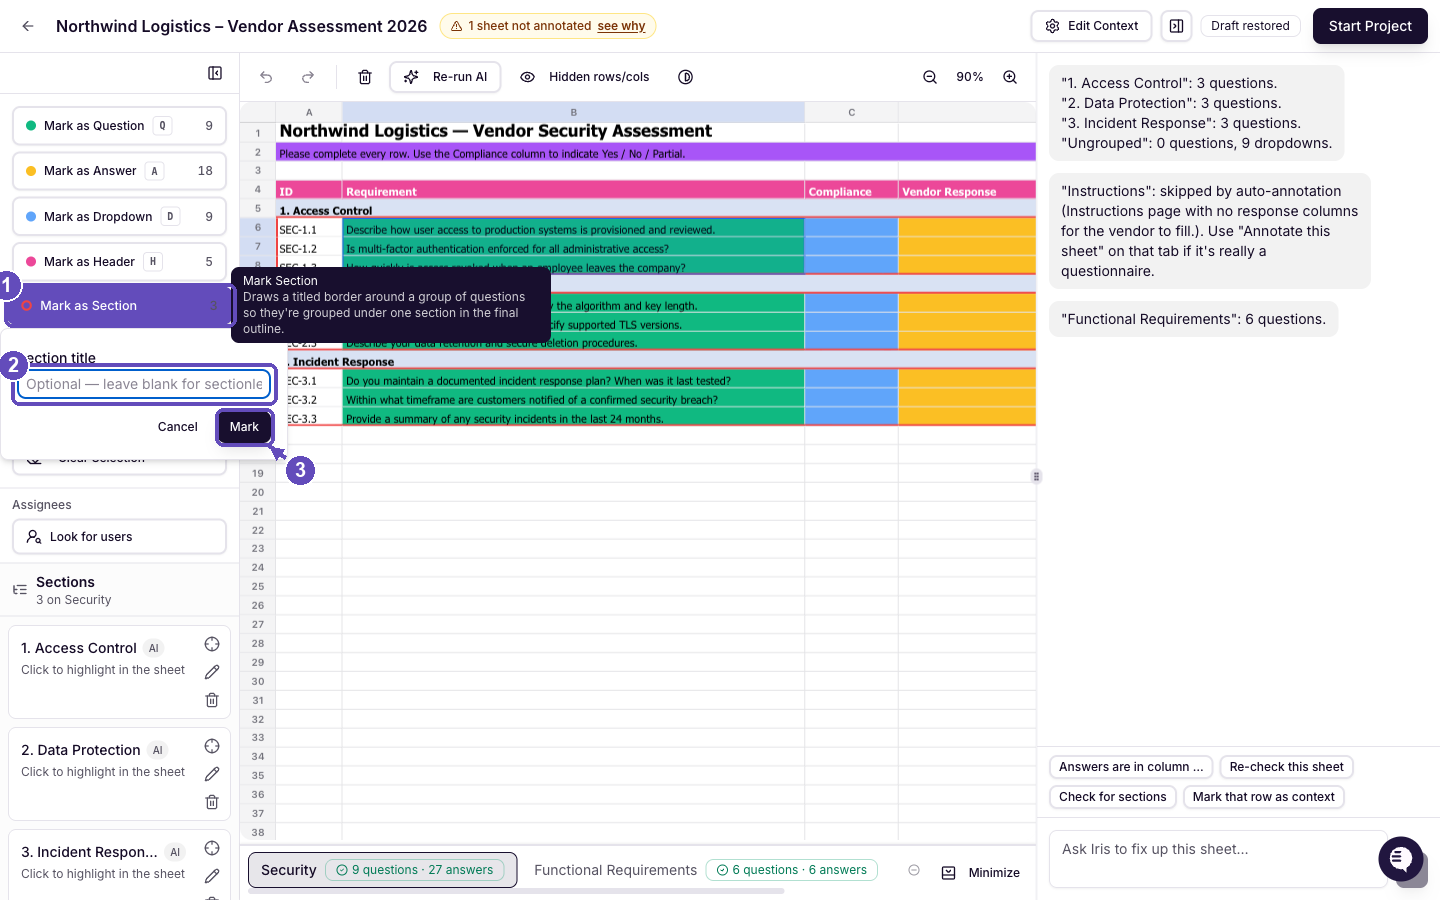
(1) Mark as Section opens a small popover. (2) Type the title and (3) click Mark.
Starting over on a sheet
Clear Selection removes the marks from the cells you have selected. Clear sheet removes every mark on the active sheet; a confirmation dialog explains what will be cleared, and Undo brings it back if needed.
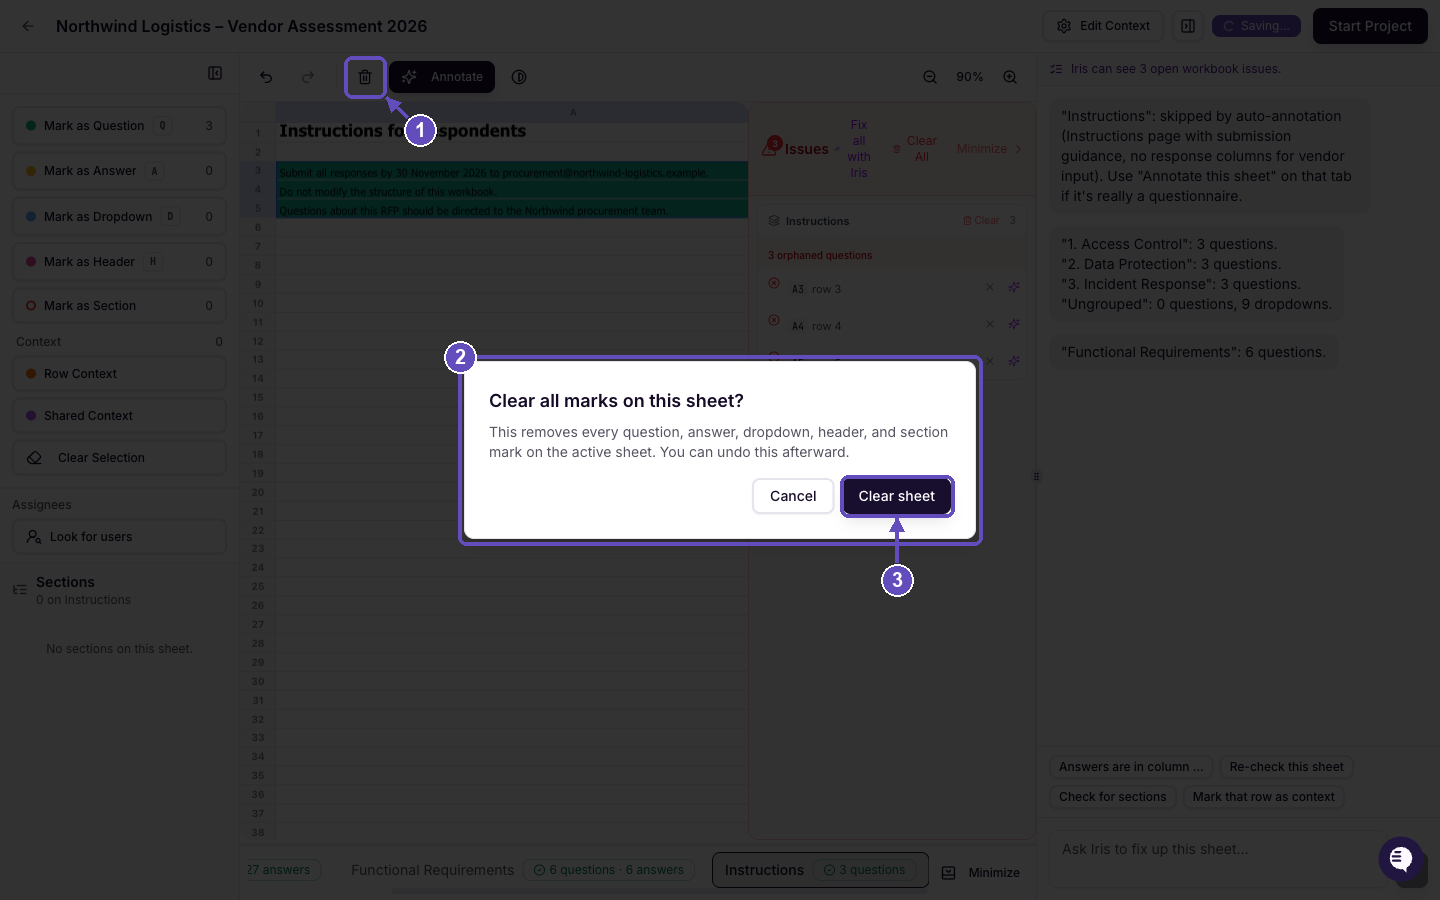
(1) The trash icon clears the active sheet. (2) A confirmation explains what will be removed; (3) Clear sheet can be undone afterwards.
Section settings and assignees
Sections let you give one group of questions its own tags, instructions, workflow or assignee. Open a section's settings with the pencil icon on its card, or ask Iris to create sections for you (see the chat examples below).
Section Title: used by Iris as context when answering the questions inside it.
Project Preset: applies a preset's tags, instructions and context to this section only.
Tags: which Knowledge Map content answers the questions in this section.
Custom instruction: styling guidance that overrides the project-level instructions for this section.
Section Workflow: a review workflow for this section only.
Assignee: a user or group assigned to every question in the section.
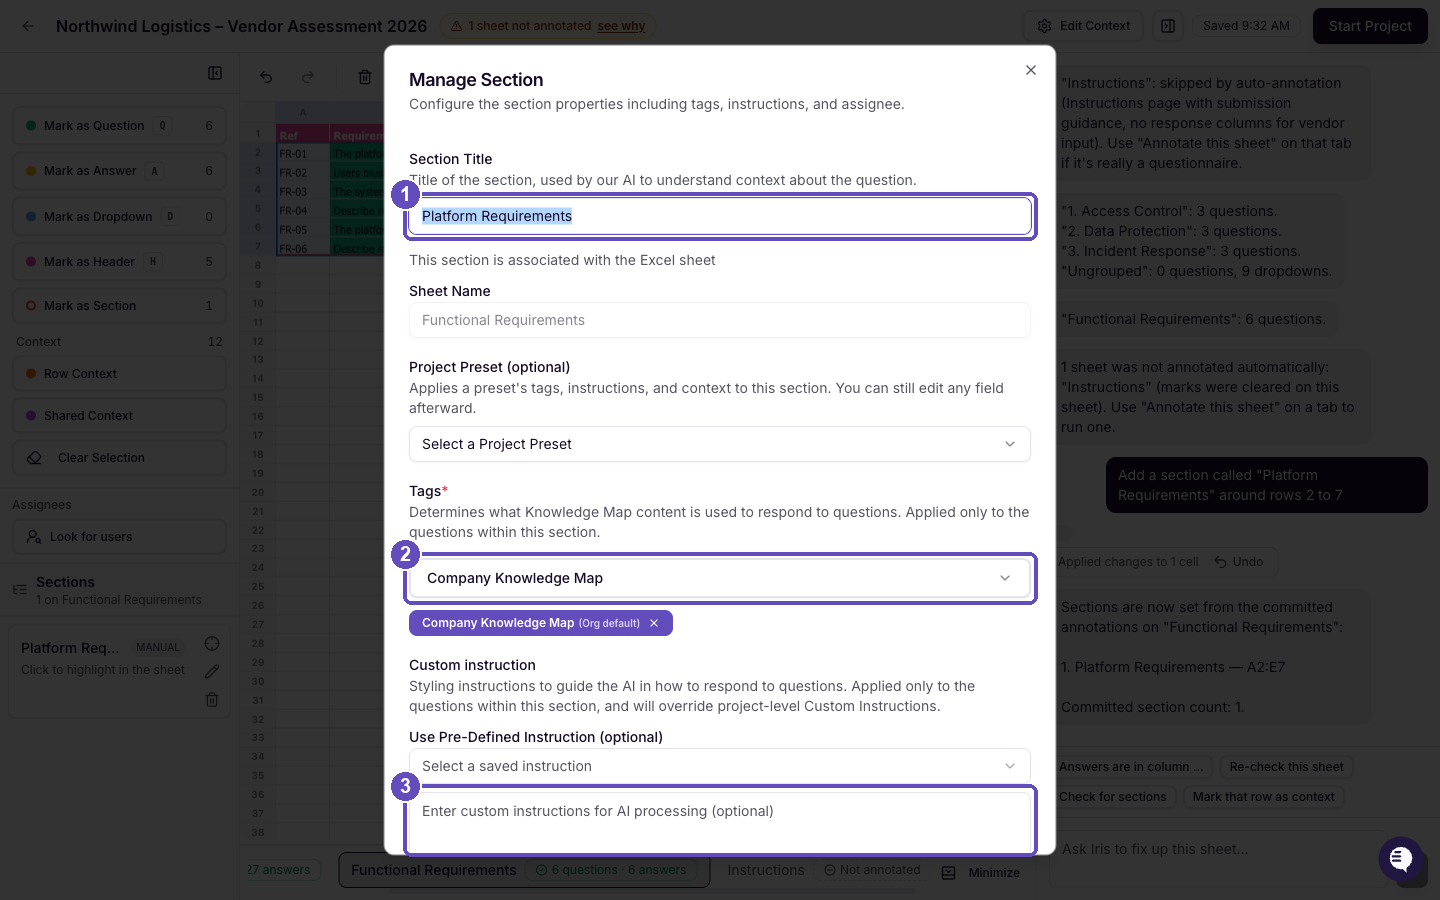
Manage Section: (1) title, (2) tags that scope the Knowledge Map for this section, (3) custom instructions. Any field you leave blank falls back to the project-level setting.
Assign questions from a column
If your spreadsheet already has an owner column with people's names, click Look for users under Assignees. Iris reads the names in the column you pick and assigns each question to the matching Iris user. Names it cannot match, or that match several people, are listed under Needs review with a picker for each. The button becomes available once questions are marked. If the project uses an approval workflow, assignees come from the workflow steps instead.
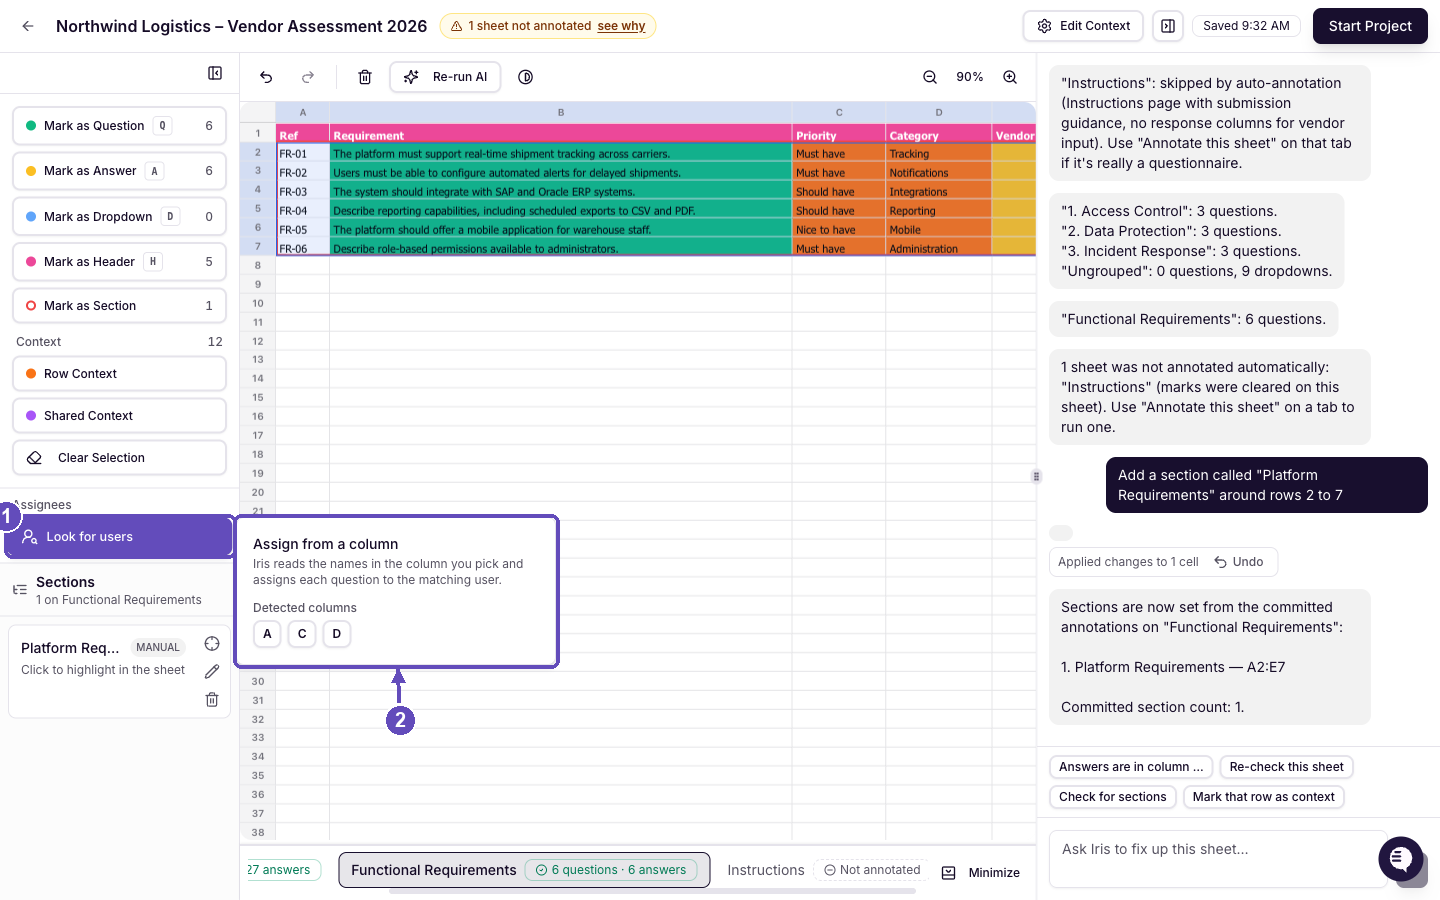
(1) Look for users opens a popover that (2) lists the columns that look like they contain names. Pick one and Iris assigns each question to the matching user.
Asking Iris in the chat
The chat panel on the right is the fastest way to fix a sheet. Type a request in plain language (Enter sends, Shift+Enter adds a line), or click one of the quick prompts under the summary: "Answers are in column …", "Re-check this sheet", "Check for sections", or "Mark that row as context".
Iris can mark, unmark and move question, answer, dropdown and header cells, add or change sections, set row or shared context, and highlight cells so you can check them. Every change it makes shows up as a chip, "Applied changes to N cells", with an Undo button, and the grid updates immediately.
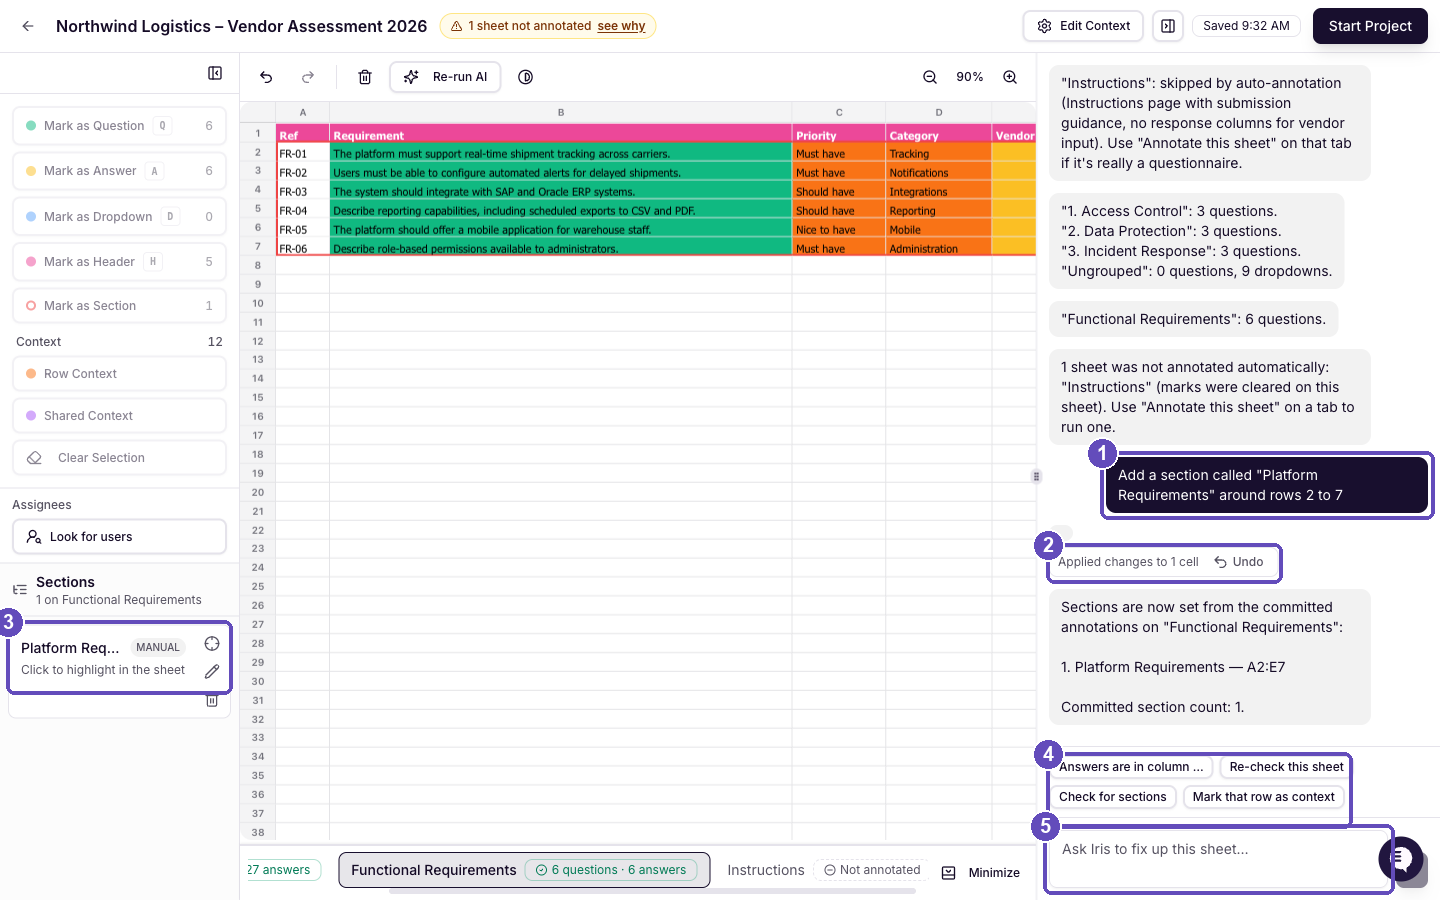
Asking Iris to add a section: (1) your request, (2) the Undo chip reverts the change in one click, (3) the new section appears in the Sections panel marked MANUAL, (4) quick prompts, (5) chat input.
Example requests
"Answers go in column E, not D."
"Row 2 is an instruction, not a question. Mark it as shared context."
"Group rows 10 to 24 into a section called Data Protection."
"Re-check this sheet, the questions start at row 8."
"Mark the Compliance column as dropdowns."
Iris keeps an eye on workbook issues as you work. When it spots several at once it offers to fix them: "Iris found N workbook issues. Fix them automatically?" Choose Fix them or Not now. Every fix can be undone. The chat has a fair-use limit; if you see "Chat rate limit reached", wait a moment and continue. |
The Issues panel
The Issues panel appears over the grid whenever something in the mapping needs attention. Issues are grouped by sheet, and each row has three actions: click the cell reference to jump to it, the × to unmark it, or the sparkle to let Iris fix that one issue. Fix all with Iris and Clear All act on the whole list.
Issue | Blocks Start Project? |
|---|---|
Orphaned question (a question with no answer or dropdown cell) | Yes |
No questions marked anywhere in the workbook | Yes |
Orphaned answer or dropdown (no question on its row) | No, warning only |
Duplicate question text on the same sheet | No, you are asked to confirm |
Several questions on one row | No, you are asked to confirm |
Duplicate question text usually means a drag-fill or paste copied rows in the original file. When you click Start Project with duplicates or multi-question rows present, Iris shows "Check these rows before starting" and offers Review issues or Start project anyway.
Step 5: Start the project
Everything you do in the staging area is saved automatically. Check the chip next to Start Project first: it reads "Saved" with a time when your draft is safe, "Draft restored" when you come back to a project you left earlier, and "Saving…" or "Unsaved changes" when you should wait a moment. If it ever reads "Autosave unavailable" or "Workbook save failed", click Save now or Retry save before continuing.
Click Start Project. If the button is greyed out, hover it for the reason: annotation or a chat fix still running, the draft not saved yet, or context files in the Project Hub still processing. Iris checks the workbook, then creates one question per marked cell, grouped by section, and starts generating answers. Dropdown questions are answered with one of the cell's options. You land on the project page, where the sections, questions and answer columns from your mapping are laid out exactly as you marked them.
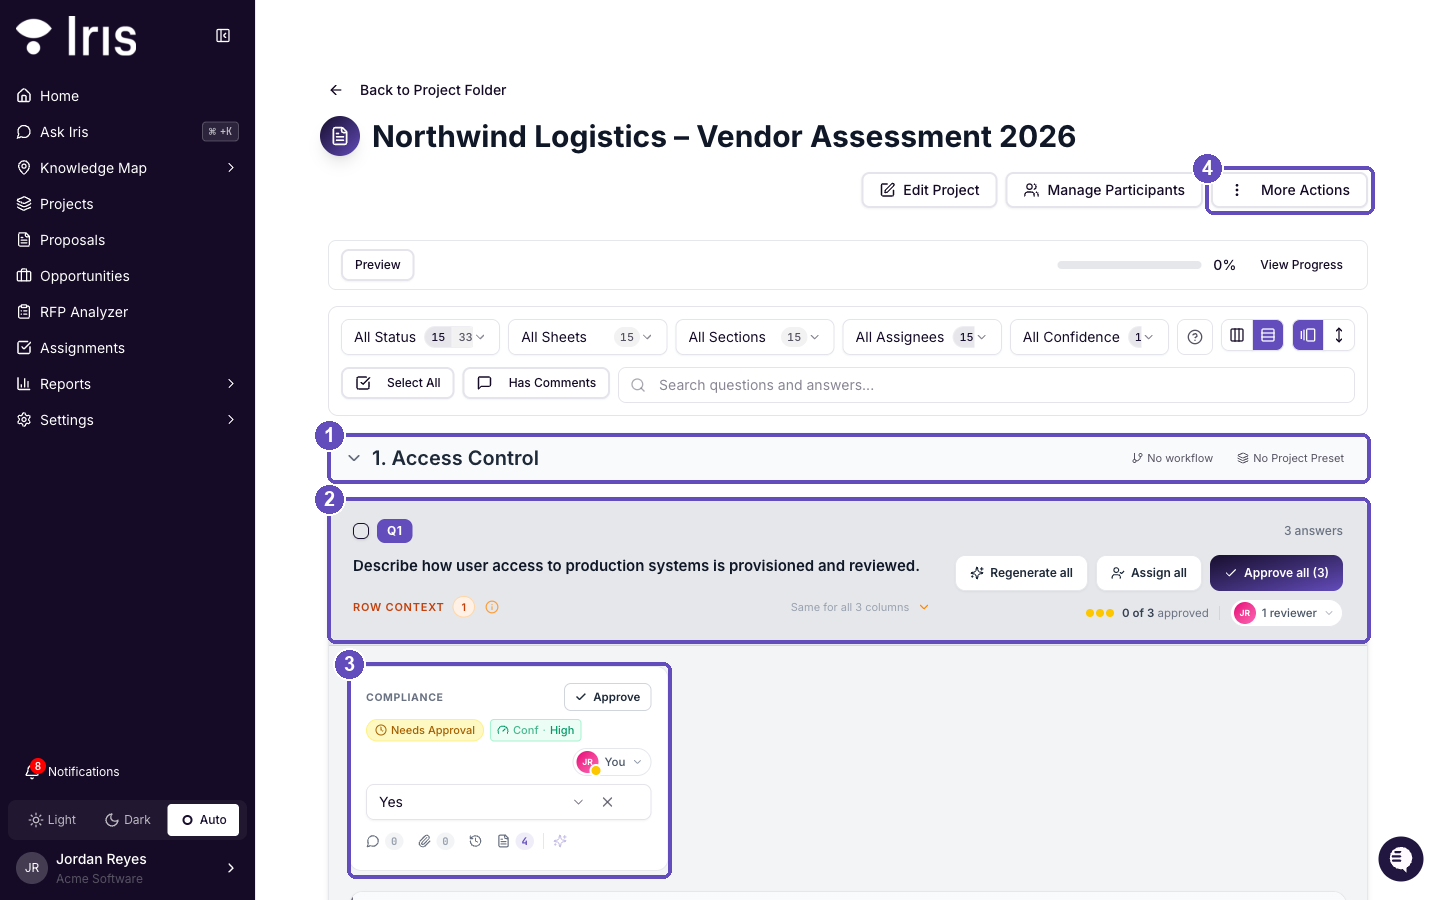
The project page after starting: (1) sections become collapsible groups, (2) each question card carries its row context and reviewer, (3) each marked answer column becomes its own answer with status, confidence and approval, (4) More Actions.
If you open the same staging draft in two tabs, or two people edit it, Iris pauses autosave and shows "Your latest changes didn't save because this draft changed elsewhere". Choose Keep my changes or Load saved version to continue. |
Re-staging an existing project
If Iris missed questions, or the customer sends an updated workbook with new rows, you can add them without touching the answers you already have. Open the project, click More Actions and choose Re-stage Project. The option is available once the project has finished generating answers.
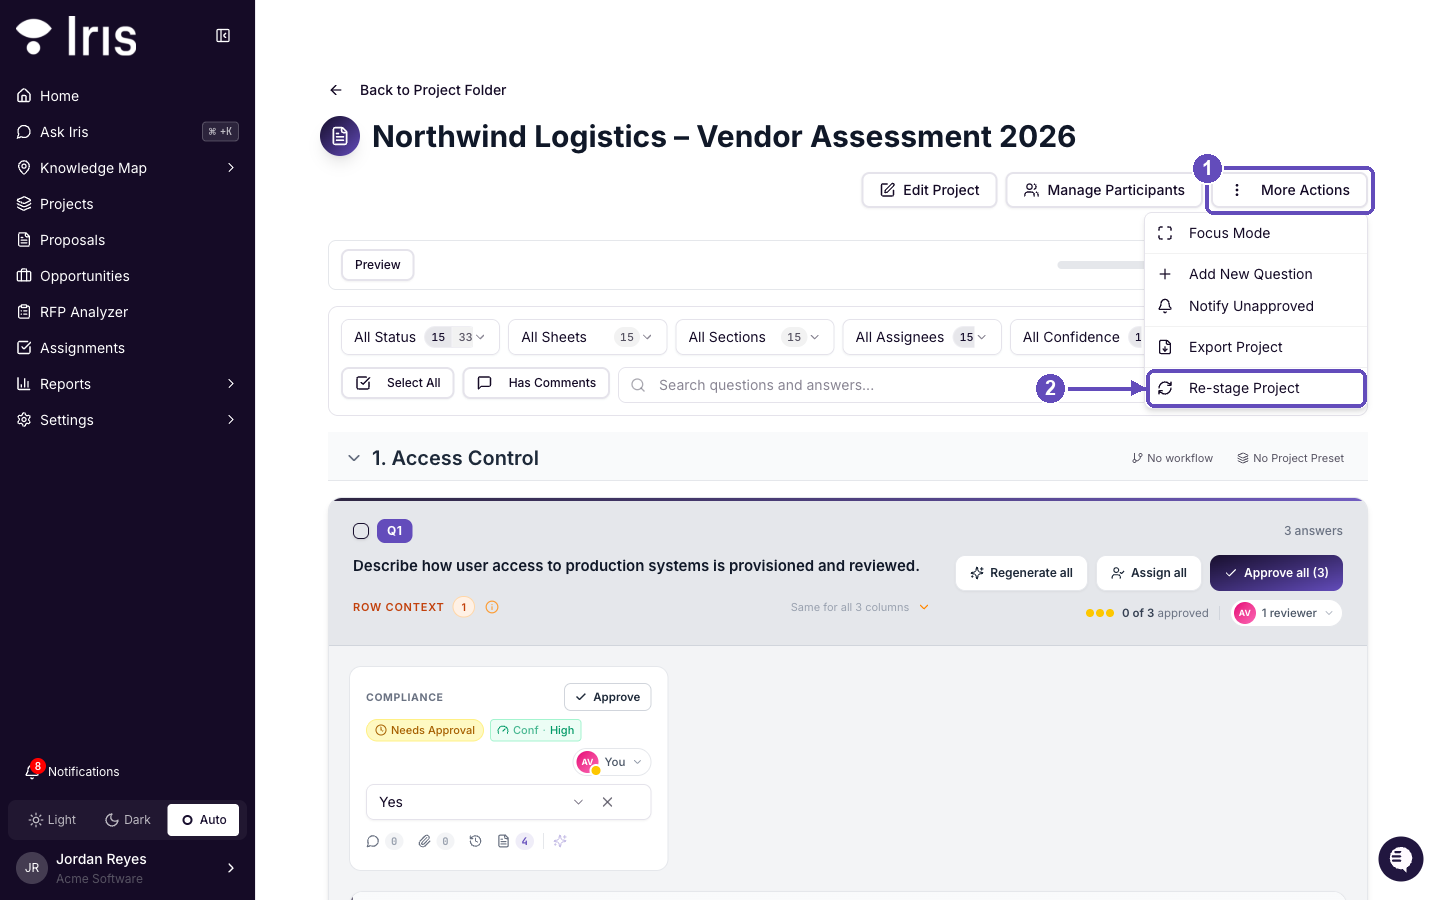
(1) Open More Actions on the project page and choose (2) Re-stage Project.
The staging area opens with every existing mark shown in muted colours and locked. Locked marks cannot be moved, cleared or overwritten, by you, by the AI or by chat, so nothing already in the project is disturbed. Anything new you mark appears in the normal colours.
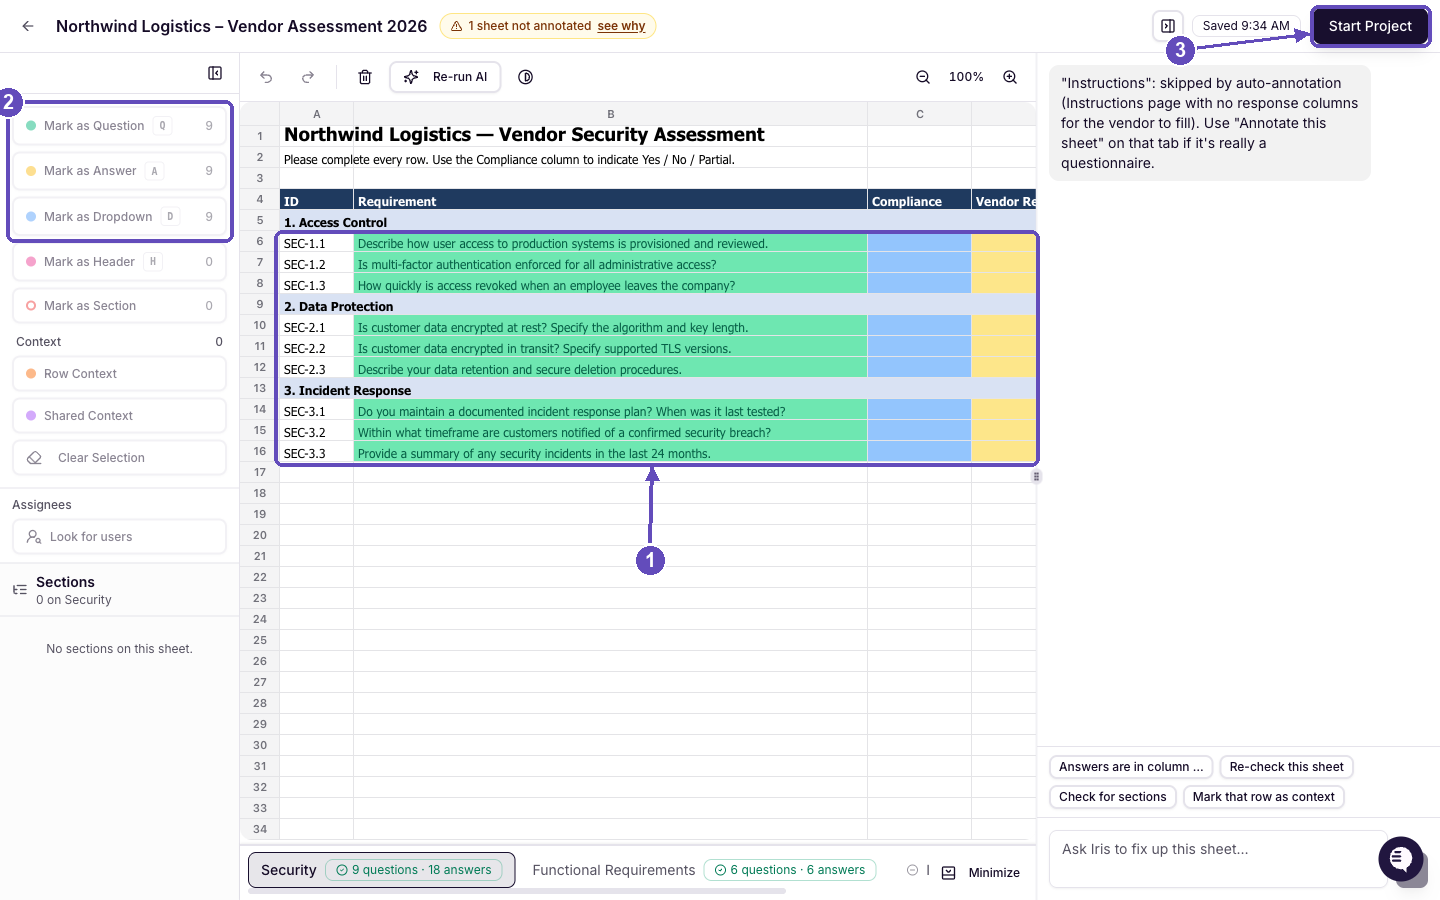
Re-stage view: (1) existing questions, answers and dropdowns are locked and shown in muted colours, (2) the tool counts reflect only what is already in the project, (3) Start Project applies the new marks.
What you can add in re-stage
New questions, with their answer or dropdown cells.
New answer columns for existing questions.
Header marks that change an answer column's label.
A new section around existing questions, or new row and shared context.
Reviewer, tags, instructions and workflow are carried over from the project, so there is no Edit Context button here. Re-stage does not run automatic annotation again (use Annotate or the chat if you want AI help), and cell edits are not saved to the workbook in this mode. Click Start Project when done: only the new items are added, existing answers, approvals and comments are untouched, and the project page reopens. If you have not marked anything new, Iris tells you "Nothing new to add".
Tips, limits and troubleshooting
Limits
Files up to 75 MB. Strict Open XML workbooks must be re-saved as a standard .xlsx first.
Automatic annotation reads the first 2,000 content rows of each sheet. Rows past that show "Rows are past the annotation limit" and can be marked by hand.
Very large workbooks may leave some sheets with "Over the automatic sheet limit". Open each one and click Annotate to run Iris on it.
Hidden sheets, rows and columns are never annotated automatically.
Troubleshooting
What you see | What to do |
|---|---|
A sheet shows Skipped but it does contain questions | Open the sheet and click Annotate in the toolbar, or ask in chat: "This sheet is a questionnaire, annotate it." |
Iris marked the wrong column as answers | Click the "Answers are in column …" quick prompt and tell it the right column. Your manual marks are never overwritten. |
Sheet tab says "AI failed, annotate manually" | Click Retry on the tab, or mark the sheet yourself. |
"Automatic annotation did not finish" | Click Re-run AI on the affected sheet. |
Some rows seem invisible to Iris | Hidden rows and columns are excluded from AI annotation. Use the Hidden rows/cols button to see what is there, and unhide them in Excel if they matter. |
Template text such as "Enter your response here", "TBD" or "N/A" sits in answer cells | That is fine. Iris treats these placeholders as empty answer cells. |
"Autosave unavailable" chip | Click Save now to save what is on screen, or Try loading again. Start Project still works. |
"Your latest changes didn't save because this draft changed elsewhere" | Another tab or person edited the same draft. Choose Keep my changes or Load saved version, then continue. |
"Chat rate limit reached" | Wait a moment, then continue. The limit resets on its own. |
The page shows "We couldn't open this file" | The workbook could not be parsed. Re-save it in Excel as .xlsx and upload again. |
Start Project is greyed out | Hover the button for the reason. Usually annotation, a chat fix or a save is still in progress. |
You see the older staging screen instead of this one | Excel Staging v2 is turned on per organisation. Ask your Iris contact to enable it. |
Need help? Contact your customer success manager or email support@heyiris.ai.